6. Channel Management
Channel Management connects external sales channels and business systems to CSG. It maintains store connections and synchronization settings and allows authorized users to monitor orders received from external platforms.
6.1 Overview
The Channel Management module is used to integrate external sales channels with this system. Once a sales channel is connected, customer orders can be synchronized automatically from the external platform to the warehouse management system . The module also supports inventory synchronization and order writeback, allowing customers to monitor the fulfillment status of their online orders.
The Channel Management module includes:
Store – Manage connected sales channels and synchronization settings.
External Platform Orders – View and manage orders synchronized from external platforms.
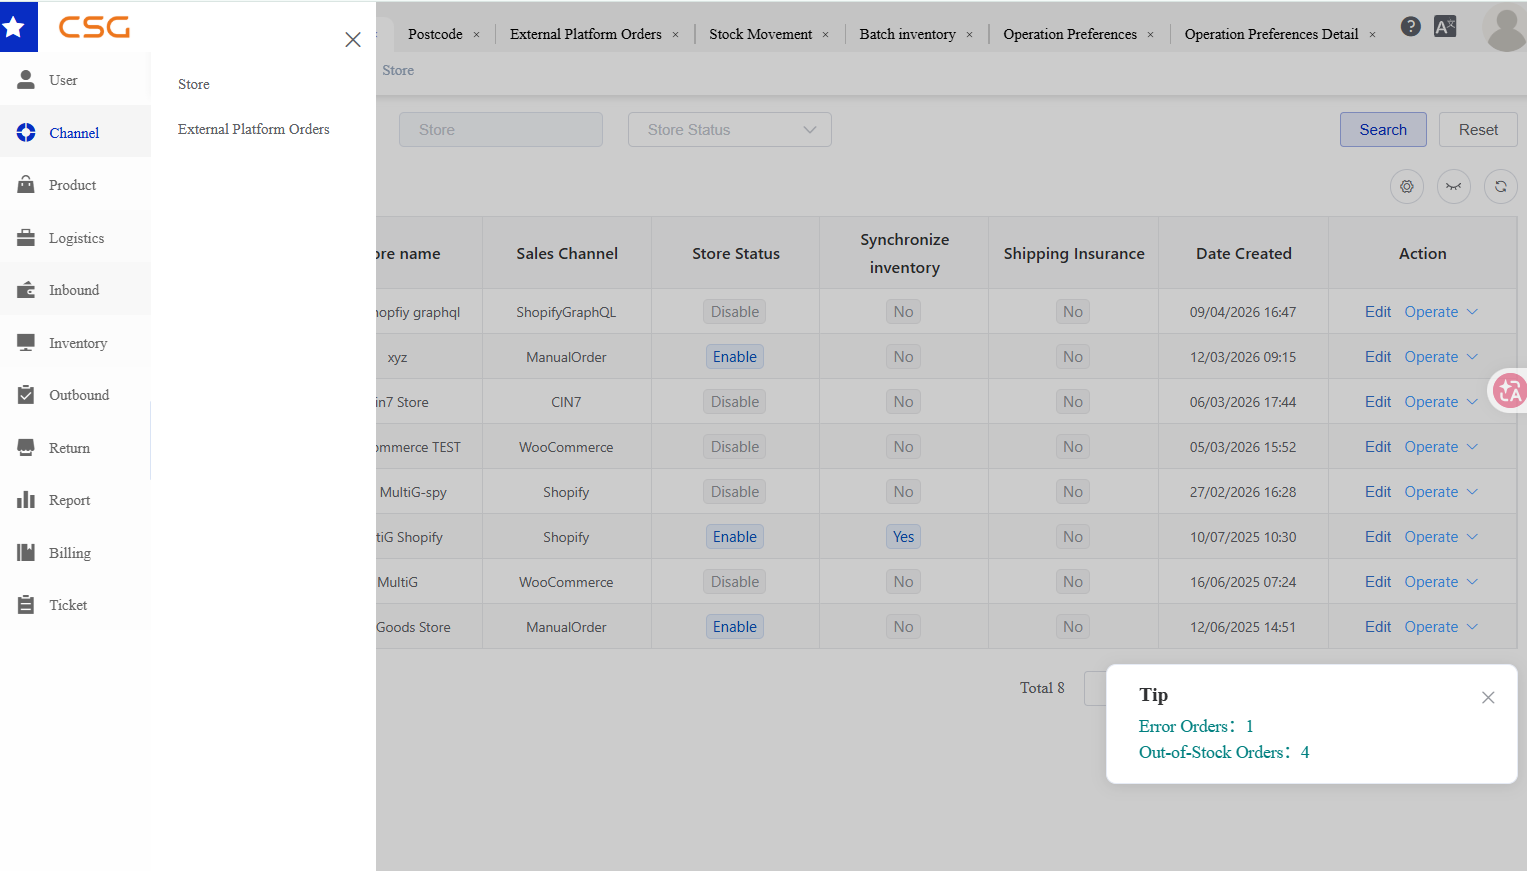
Figure 1. Overview screen from the CSG ERP User Manual.
6.2 Store
6.2.1 Overview
Navigation
The Store page displays all connected stores under the customer company.
Users can:
Search stores information
Add new stores
Store Actions
6.2.2 Store Information
| Column | Description |
|---|---|
| Store Name | Connected store name |
| Sales Channel | Store platform type |
| Store Status | Current store status |
| Synchronize Inventory | Whether inventory synchronization is enabled |
| Shipping Insurance | Shipping insurance setting |
| Date Created | Store creation date |
| Action | Available store operations |
6.2.3 Add Store
The Add Store function allows users to connect an external sales channel or business system to the CSG Customer Portal. The required configuration fields vary depending on the selected Channel Type. After a successful connection, the system can synchronize supported data, such as sales orders, inventory, and shipment information.
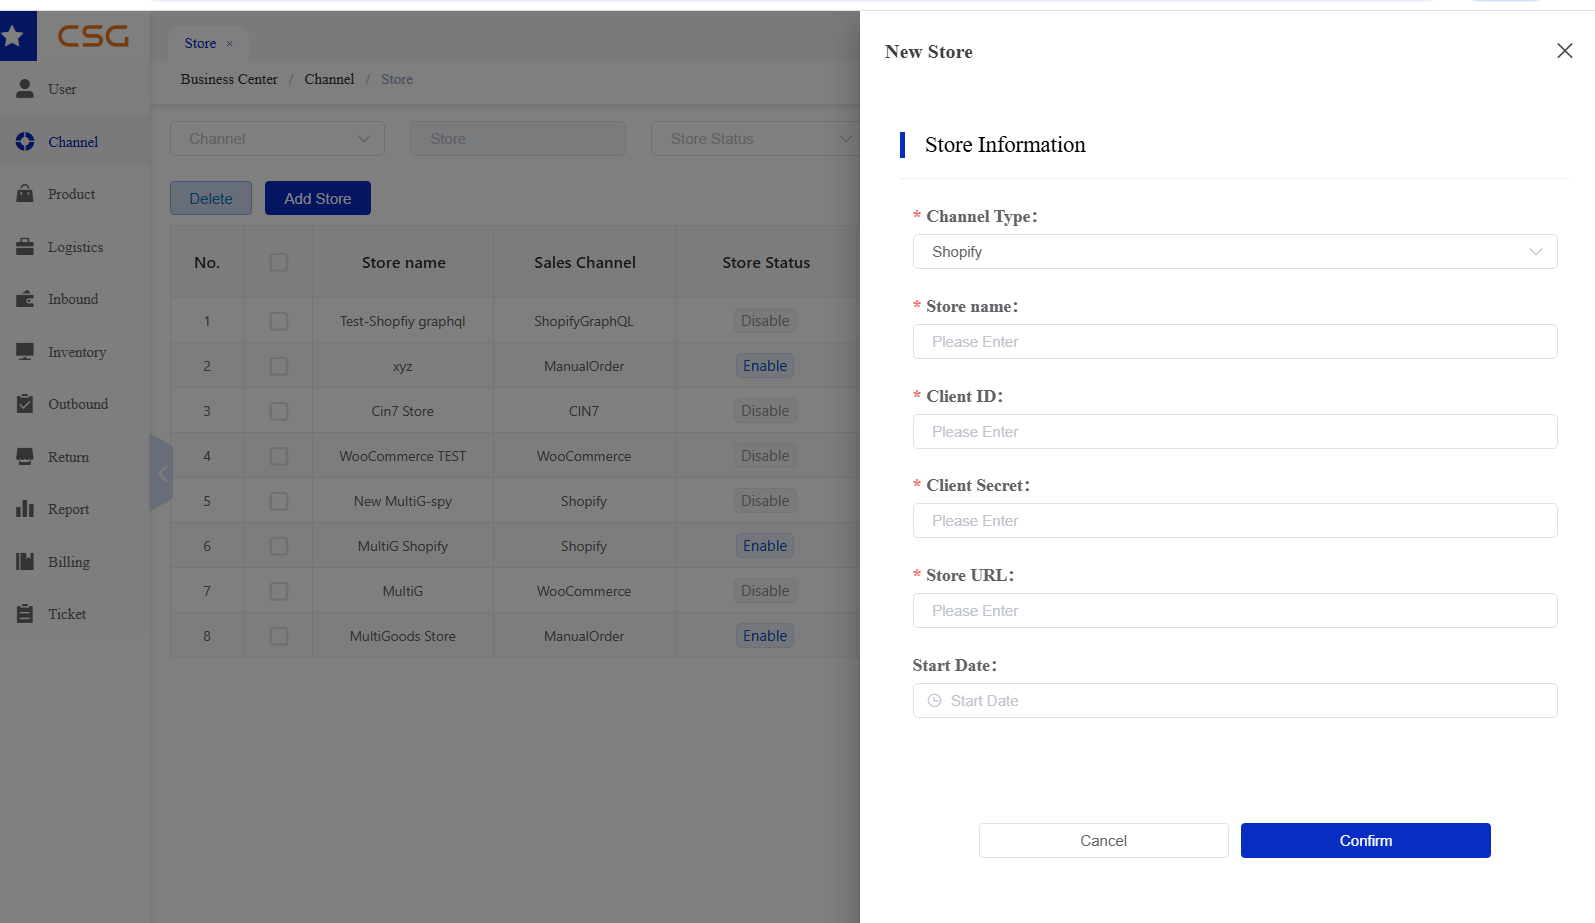
Figure 2. Add Store screen from the CSG ERP User Manual.
6.2.3.1 Shopify GraphQL
Description
Shopify GraphQL is the recommended integration method for all new Shopify stores created from April 2026 onwards. It uses Shopify's GraphQL Admin API to synchronize orders, inventory, and shipment information between Shopify and the System.
Use Shopify GraphQL if:
You are connecting to a new Shopify store.
You are creating a new Shopify custom app.
Your app uses the Shopify GraphQL Admin API.
From April 1, 2024, Shopify requires all new public and custom apps to use the GraphQL Admin API. Existing REST integrations continue to work but are considered legacy and should eventually be migrated.
Recommendation: All new Shopify integrations should use Shopify GraphQL.
Required Information
| Field | Required | Description | Where to Obtain |
|---|---|---|---|
| Channel Type | Must | Select ShopifyGraphQL | Customer Portal |
| Store Name | Must | Display name of the connected store | User-defined |
| Client ID | Must | Shopify App Client ID | |
| Client Secret | Must | Shopify App Client Secret | |
| Store URL | Must | Shopify store domain (e.g. yourstore.myshopify.com) | |
| Start Date | Optional | Date to begin synchronization | User-defined |
Required Information
How to Obtain the Required Information
- Client ID & Client Secret
- Log in to Shopify Admin.
- Navigate to Shopify Admin → Settings → Apps and sales channels.
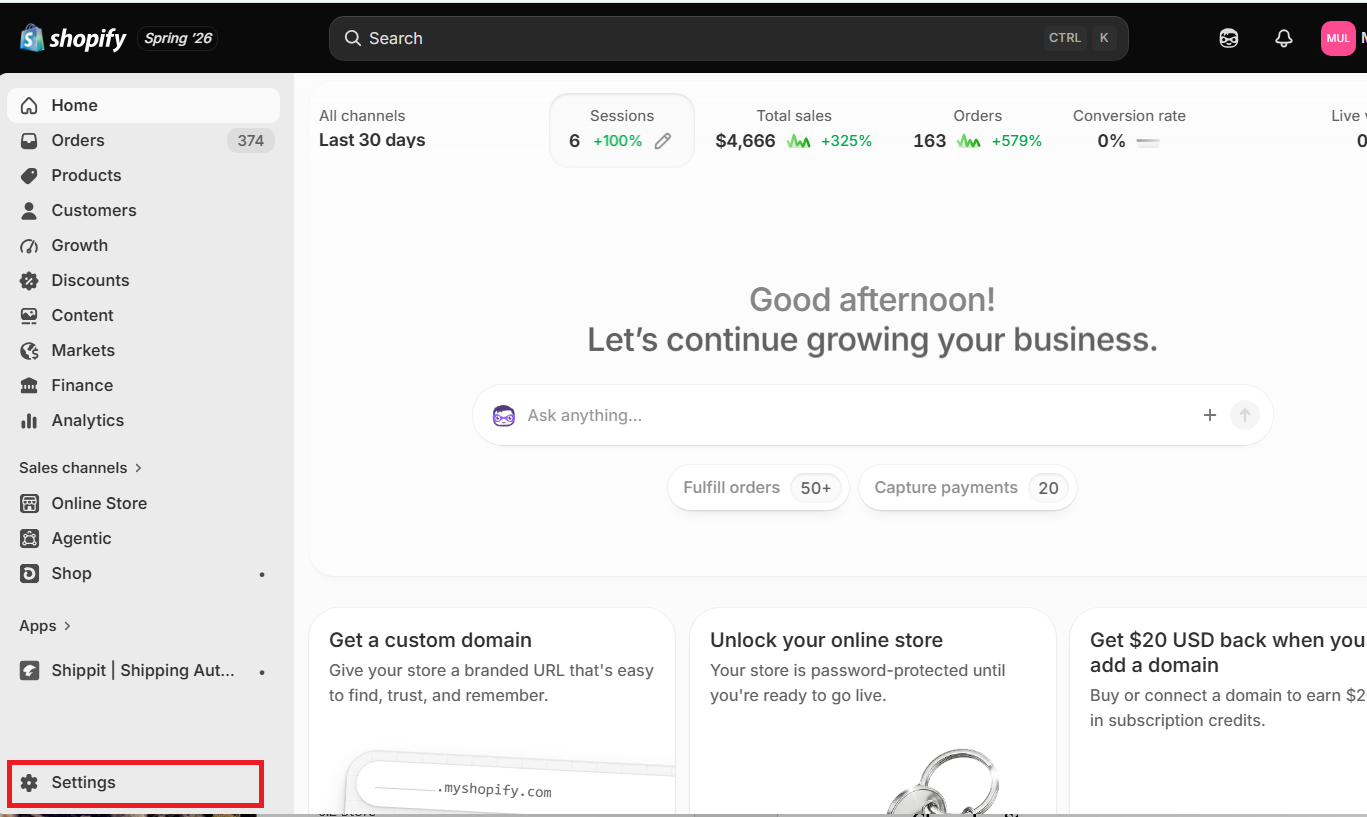
Figure 3. Shopify GraphQL screen from the CSG ERP User Manual.
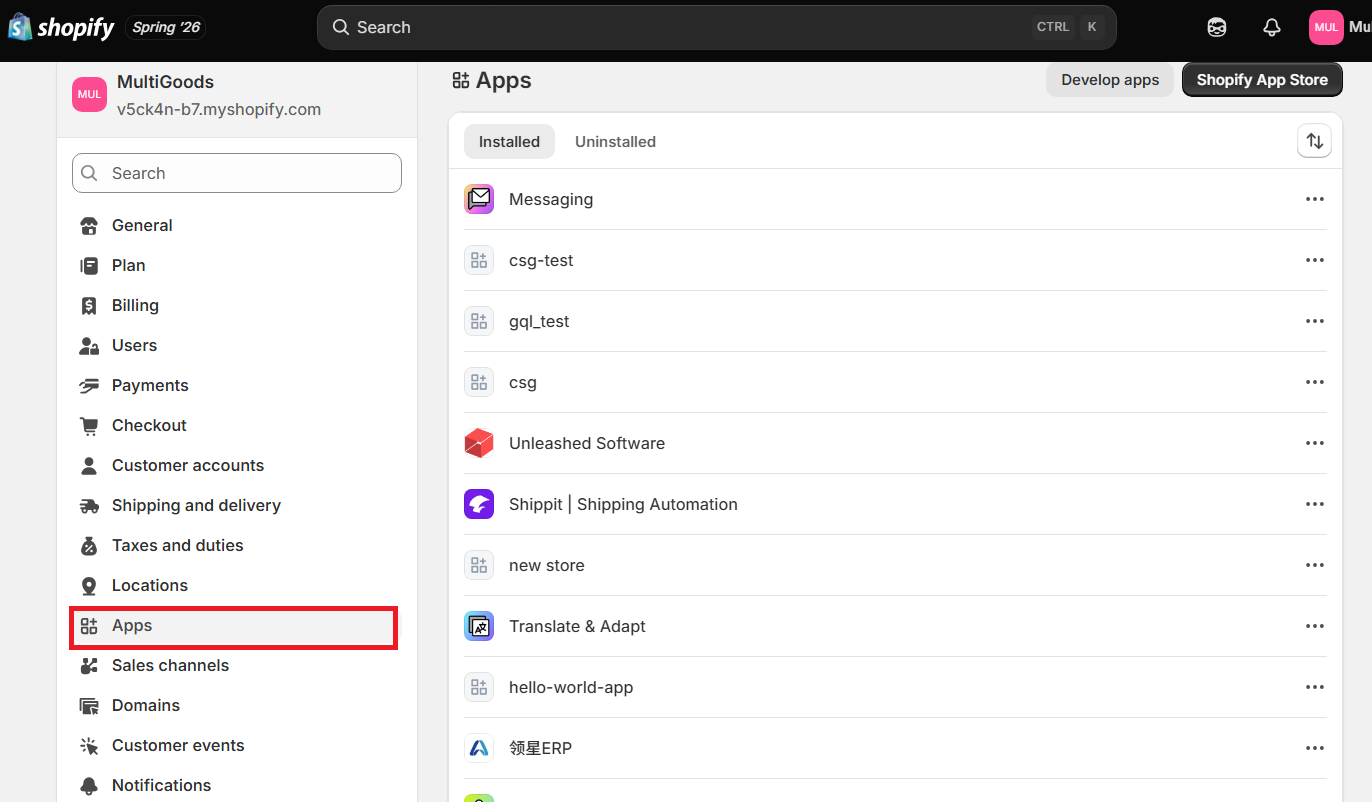
Figure 4. Shopify GraphQL screen from the CSG ERP User Manual.
Click Develop Apps.
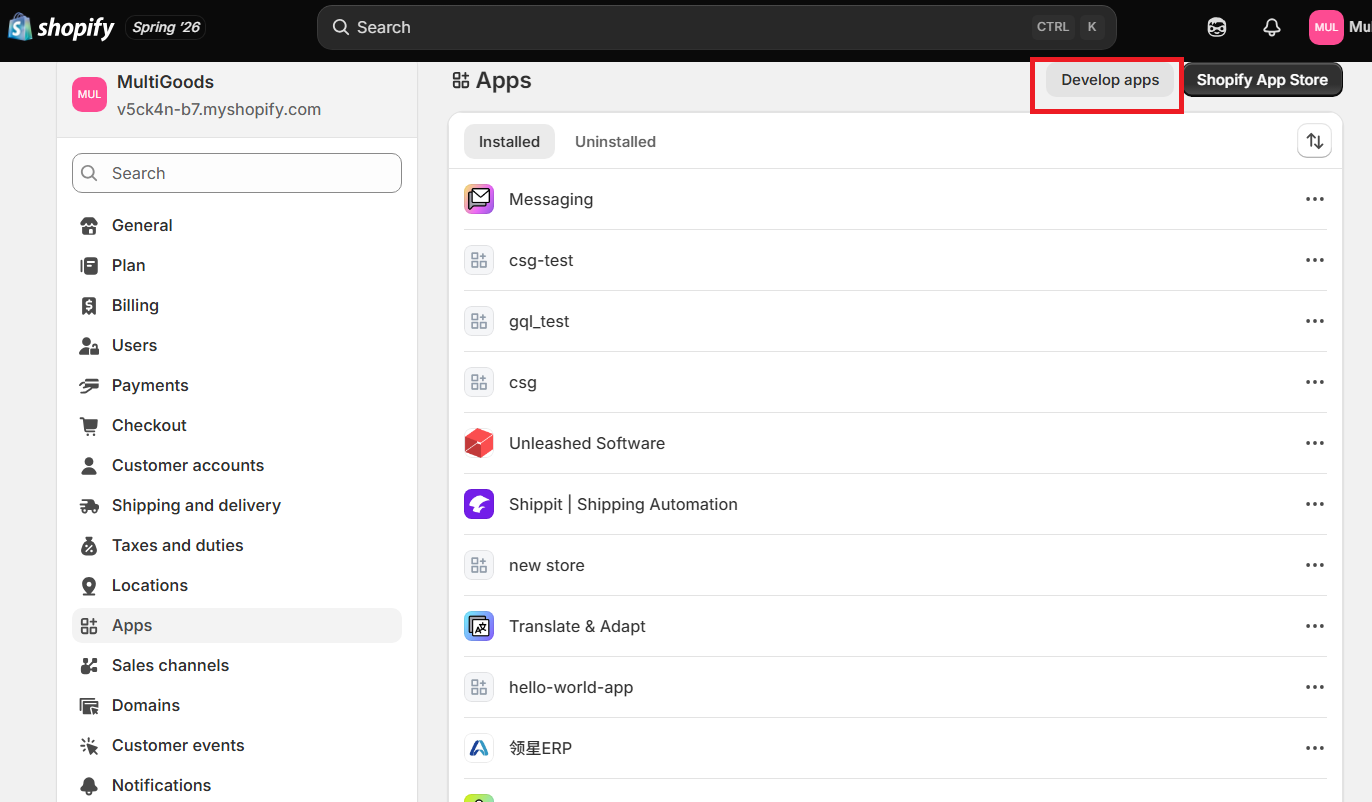
Figure 5. Shopify GraphQL screen from the CSG ERP User Manual.
Click Build apps in Dev Dashboard
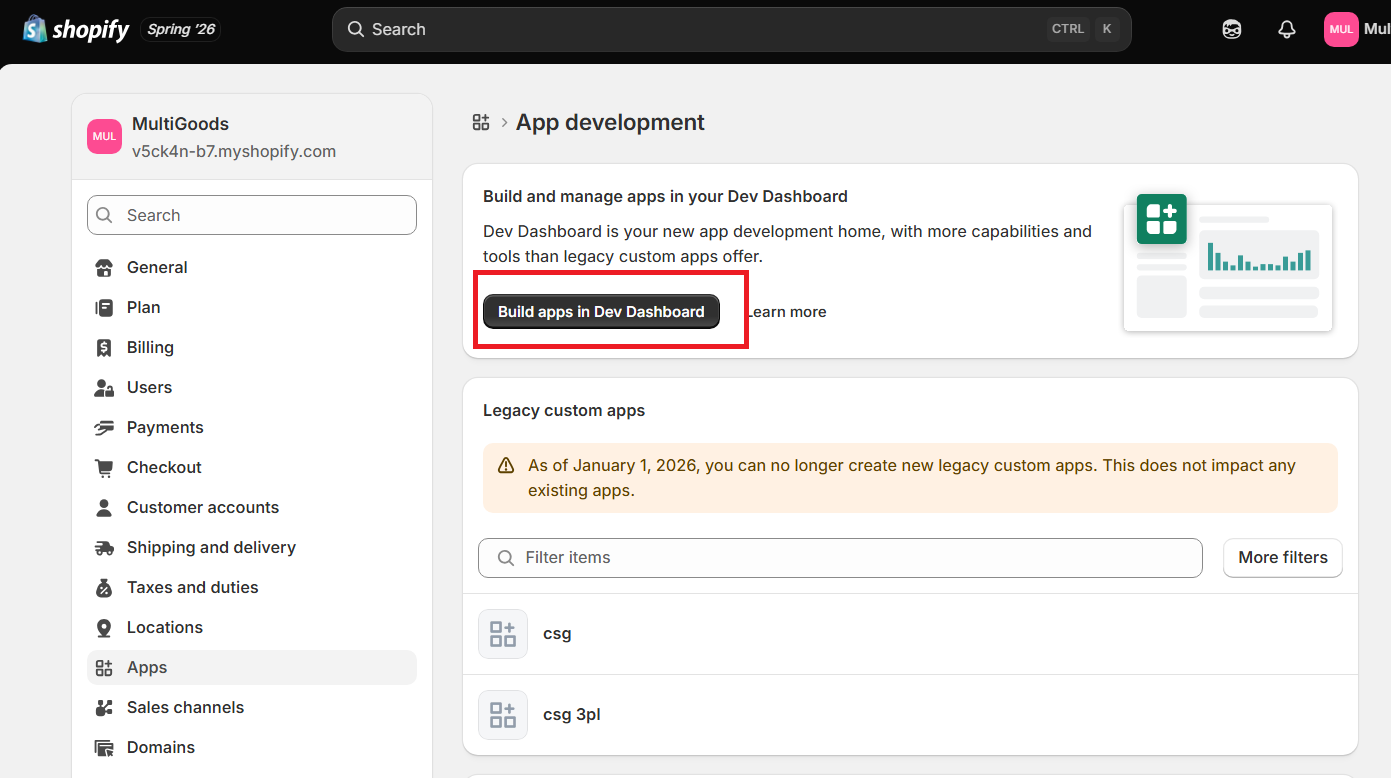
Figure 6. Shopify GraphQL screen from the CSG ERP User Manual.
Open the existing integration app (example gql_test).
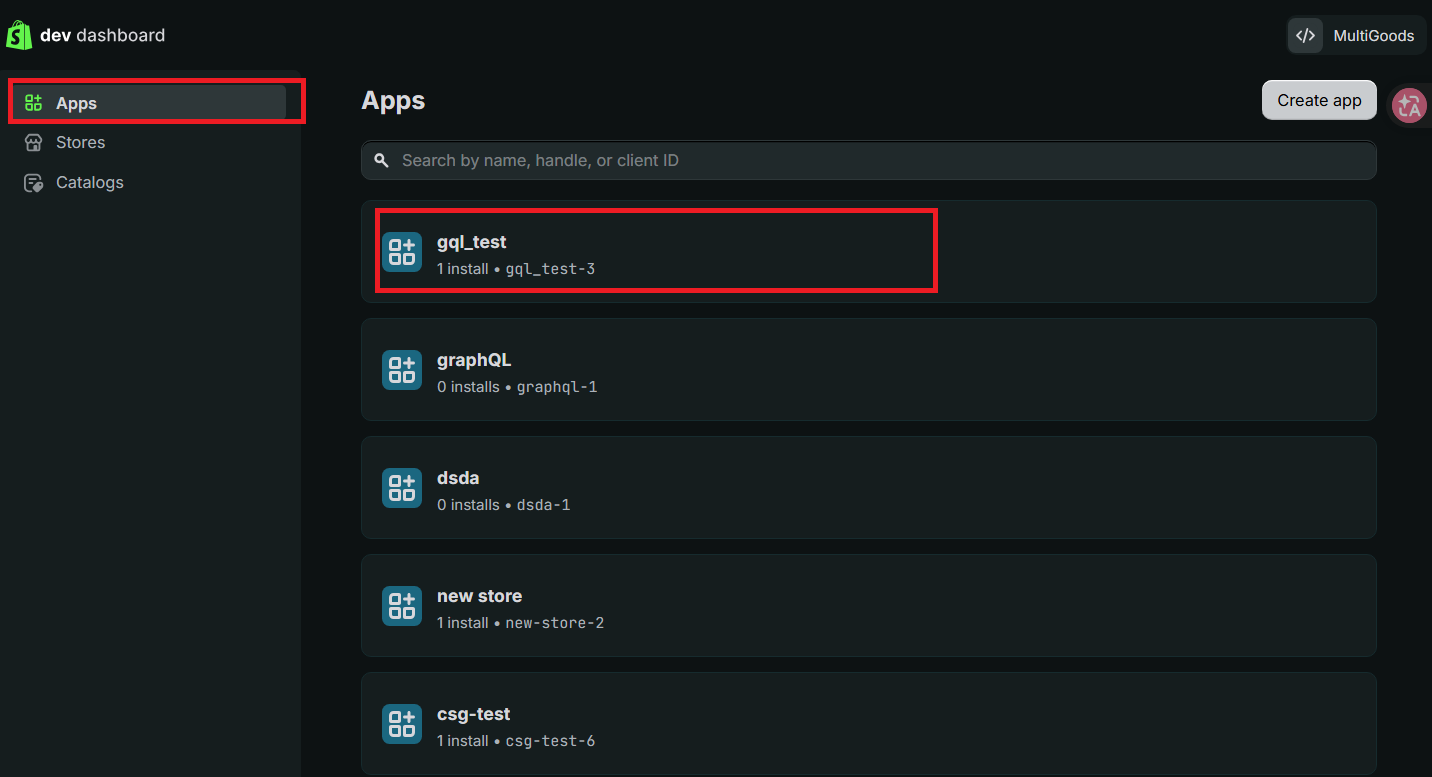
Figure 7. Shopify GraphQL screen from the CSG ERP User Manual.
Click Settings.
Under Credentials, copy:
Client ID
Client Secret
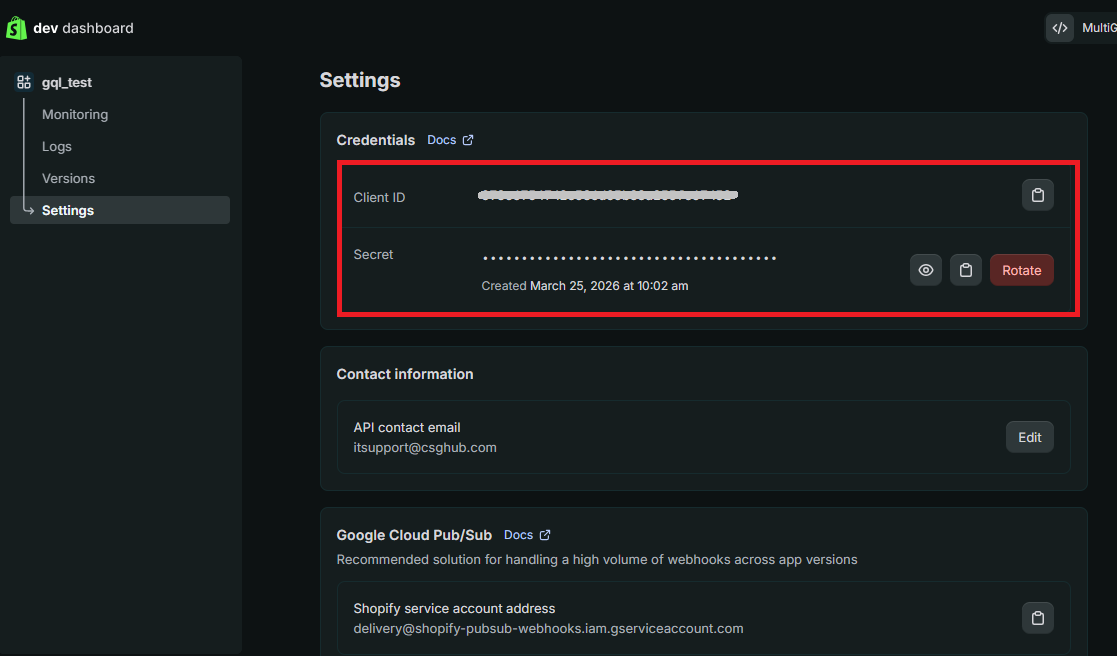
Figure 8. Shopify GraphQL screen from the CSG ERP User Manual.
Note: If a CSG integration app has not yet been created, it must be created before these credentials are available.
- Store URL
- Return to the Shopify Admin home page and navigate to Settings → Domains.
Figure 9. Shopify GraphQL screen from the CSG ERP User Manual.
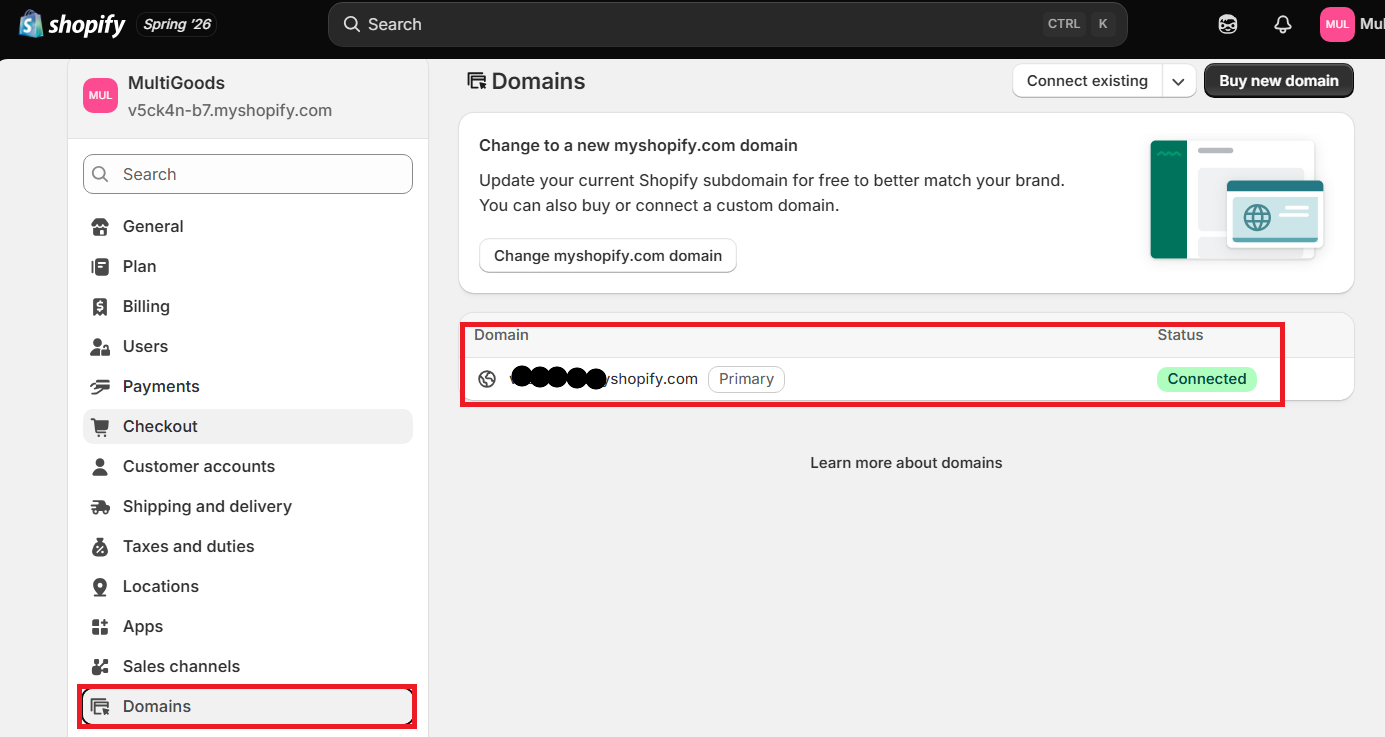
Figure 10. Shopify GraphQL screen from the CSG ERP User Manual.
- Locate the primary domain ending with.myshopify.com.
- Copy the domain only. Example: mycompany.myshopify.com
Add the Store in CSG
- Navigate to:
-
Click Add Store and enter: | Field | Value | | --- | --- | | Channel Type | Shopify GraphQL | | Store Name | Your Store Name | | Client ID | From Shopify Credentials | | Client Secret | From Shopify Credentials | | Store URL | From Shopify Domains | | Start Date | Optional | | | |
-
Click Comfirm.
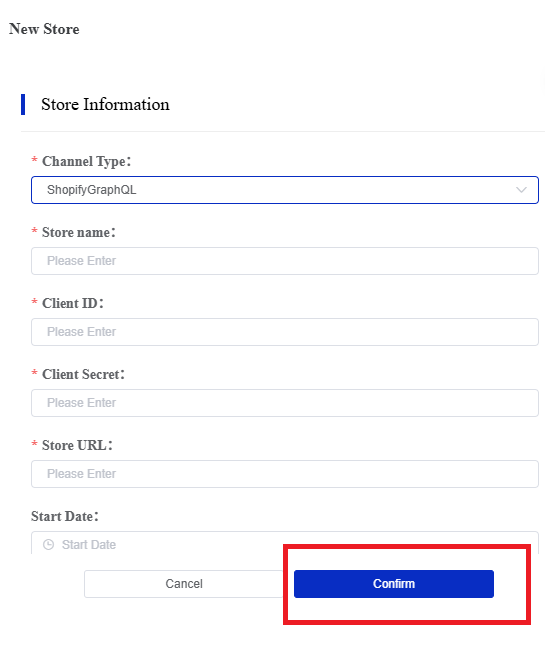
Figure 11. Shopify GraphQL screen from the CSG ERP User Manual.
6.2.3.2 Shopify
Description
Shopify uses Shopify's REST API and is provided for existing Shopify integrations created before April 2026. Existing stores may continue using this integration without interruption.
Use Shopify only if:
Your store is already connected using the legacy Shopify REST API.
You are maintaining an existing integration and do not plan to migrate immediately.
Before April 1, 2024, developers could create apps using the REST Admin API.
This option is provided for backward compatibility.
Note: This option is maintained for backward compatibility. New Shopify stores should use Shopify GraphQL instead.
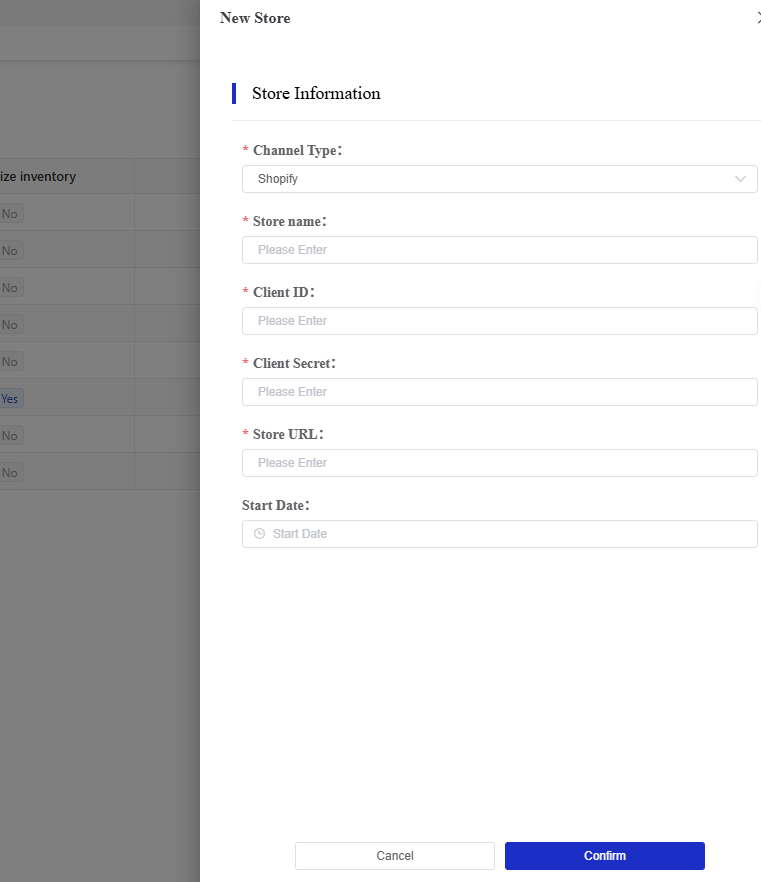
Figure 12. Shopify screen from the CSG ERP User Manual.
Required Information
| Field | Required | Required | Description | Where to Obtain |
|---|---|---|---|---|
| Channel Type | Must | Select Shopify | Select Shopify | Customer Portal |
| Store Name | Must | Display name of the connected store | Display name of the connected store | User-defined |
| Client ID | Must | Shopify App Client ID | Shopify App Client ID | |
| Client Secret | Must | Shopify App Client Secret | Shopify App Client Secret | |
| Store URL | Must | Shopify store domain (e.g. yourstore.myshopify.com) | Shopify store domain (e.g. yourstore.myshopify.com) | |
| Start Date | Optional | Date to begin synchronization | Date to begin synchronization | User-defined |
6.2.3.3 WooCommerce
Description
WooCommerce connects the Customer Portal to a WooCommerce online store using the WooCommerce REST API.
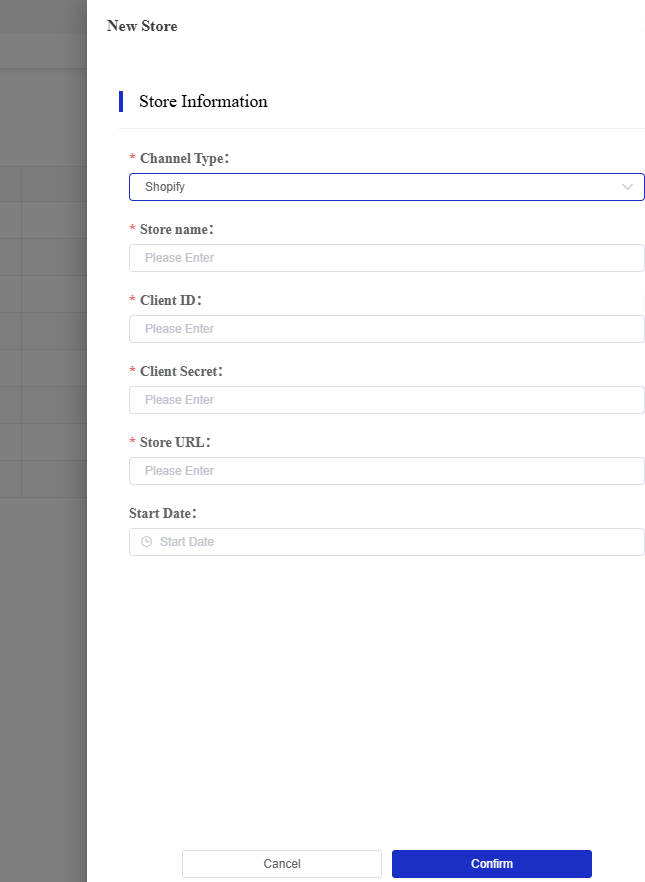
Figure 13. WooCommerce screen from the CSG ERP User Manual.
Required Information
| Field | Required | Description | Where to Obtain |
|---|---|---|---|
| Channel Type | Must | Select WooCommerce | Customer Portal |
| Store Name | Must | Display name of the connected store | User-defined |
| Consumer Key | Must | WooCommerce REST API Consumer Key | |
| Consumer Secret | Must | WooCommerce REST API Consumer Secret | |
| Store URL | Must | WooCommerce website URL | WooCommerce Admin |
| Start Date | Optional | Date to begin synchronization | User-defined |
6.2.3.4 Unleashed
Description
Unleashed is a cloud-based inventory and order management system that integrates with the CSG Customer Portal to synchronize sales orders for warehouse fulfillment.
Unlike Shopify and WooCommerce, Unleashed is primarily an inventory and order management platform rather than an e-commerce storefront. Businesses that manage products, inventory, purchasing, and sales orders in Unleashed can connect their account to CSG for automated order synchronization.
Use Unleashed if:
You use Unleashed as your inventory and order management system.
Sales orders are created and managed in Unleashed.
You want sales orders to be synchronized automatically to the CSG Customer Portal.
Your warehouse fulfillment is managed by CSG.
Recommendation: Use Unleashed if it is your primary inventory and order management platform.
Required Information
| Field | Required | Description | Where to Obtain |
|---|---|---|---|
| Channel Type | Must | Select Unleashed | Customer Portal |
| Store Name | Must | Display name of the connection | User-defined |
| API Key | Must | Unleashed API Key | Unleashed API Access |
| API Password | Must | Unleashed API Password | Unleashed API Access |
| Store URL | Must | Your Unleashed account URL | User-defined |
| Start Date | Optional | Date to begin order synchronization | User-defined |
How to Obtain the Required Information
- API Key
- Log in to Unleashed as the Account Owner.
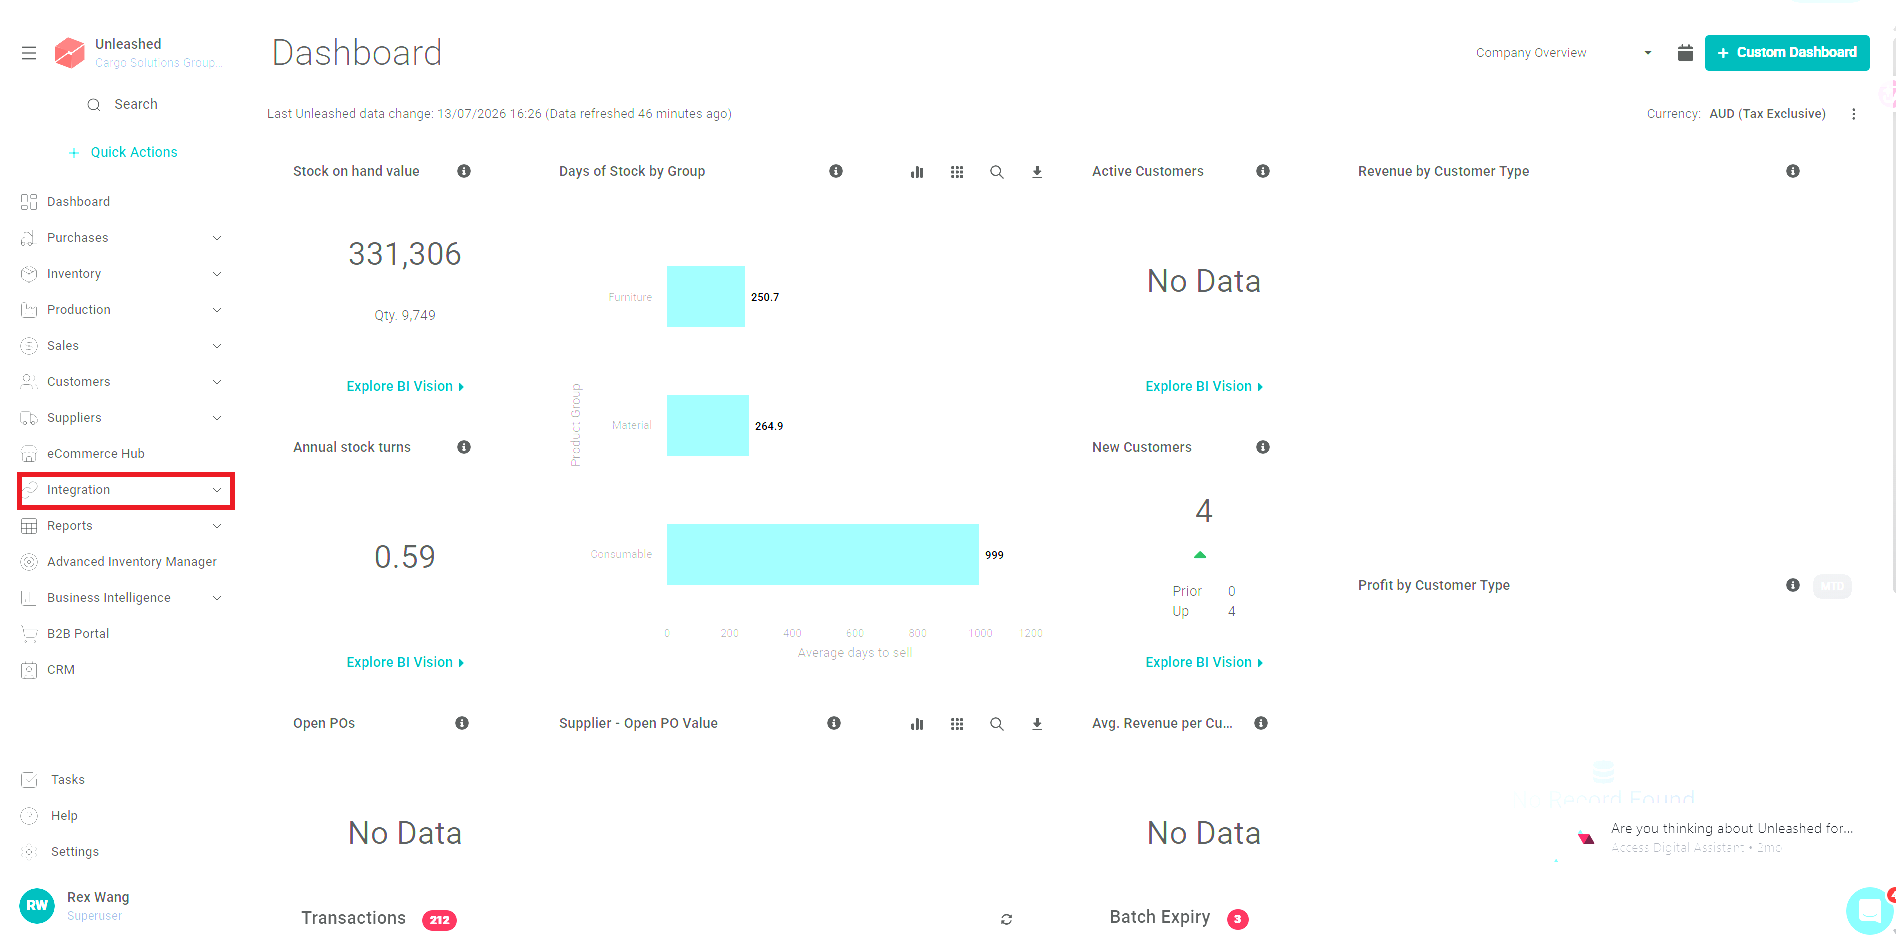
Figure 14. Unleashed screen from the CSG ERP User Manual.
- Navigate to Integration → Unleashed API Access.
- Copy: API ID and API Key
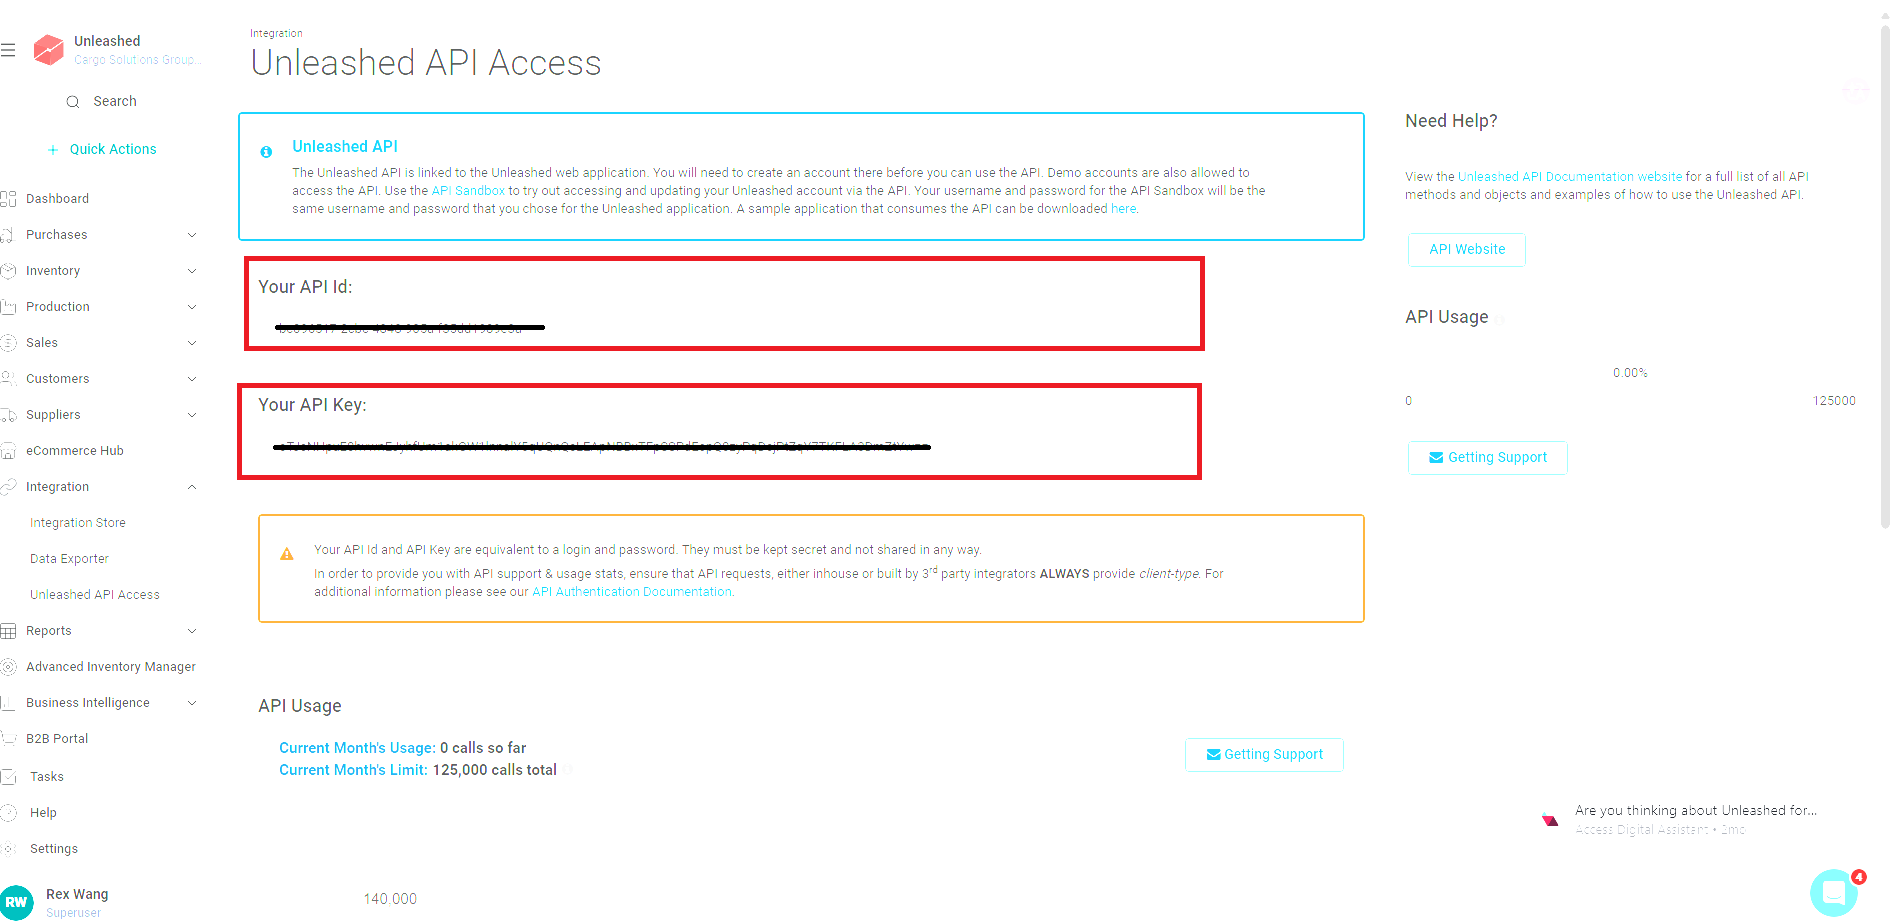
Figure 15. Unleashed screen from the CSG ERP User Manual.
Note: Only the Account Owner can access the Unleashed API Access page. If the menu is not visible, contact your Unleashed Account Owner or administrator.
- Store URL The Store URL is the base URL used to access your Unleashed account.
Log in to Unleashed.
Copy the base URL from your browser's address bar.
Enter only the base URL in the Store URL field.
Example
| Correct | Incorrect |
|---|---|
| https://go.unleashedsoftware.com | https://go.unleashedsoftware.com/Customers |
| https://go.unleashedsoftware.com | https://go.unleashedsoftware.com/SalesOrders |
Add the Store in CSG
Navigate to:
Click Add Store and enter:
| Field | Value |
|---|---|
| Channel Type | Unleashed |
| Store Name | Your Store Name |
| API Key | From Unleashed API Access |
| API Password | From Unleashed API Access |
| Store URL | Your Unleashed account URL |
| Start Date | Optional |
Click Confirm.
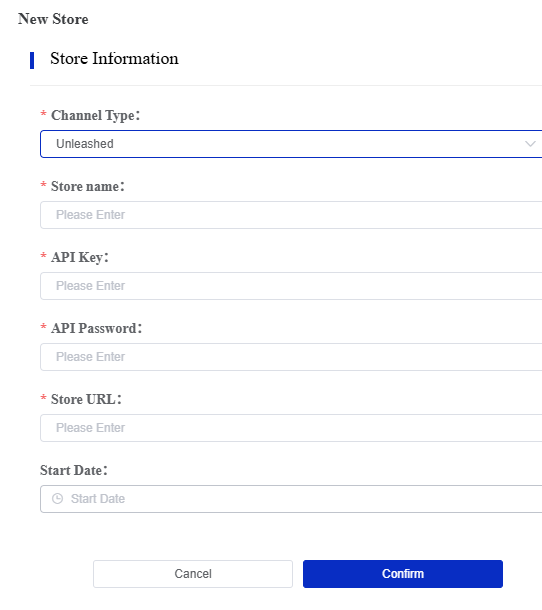
Figure 16. Unleashed screen from the CSG ERP User Manual.
6.2.4 Store Actions
Each store record includes an Operate menu.
Available actions may include:
| Action | Description |
|---|---|
| Edit | Update the store configuration, including the Store Name and Shipping Warehouse. API connection information is displayed for reference and cannot be modified. |
| Logistics Distribution | Configure the logistics provider and shipping warehouse allocation for the selected store. |
| Enable / Disable | Enable or disable the selected store. When a store is disabled, new orders will no longer be synchronized until the store is enabled again. |
| Delete | Remove the selected store connection from the Customer Portal. Deleting a store does not delete the store from the external sales platform. |
| Log | View the operation history and activity log for the selected store, including configuration changes and synchronization records. |
The available actions may vary depending on the store type and user permissions.
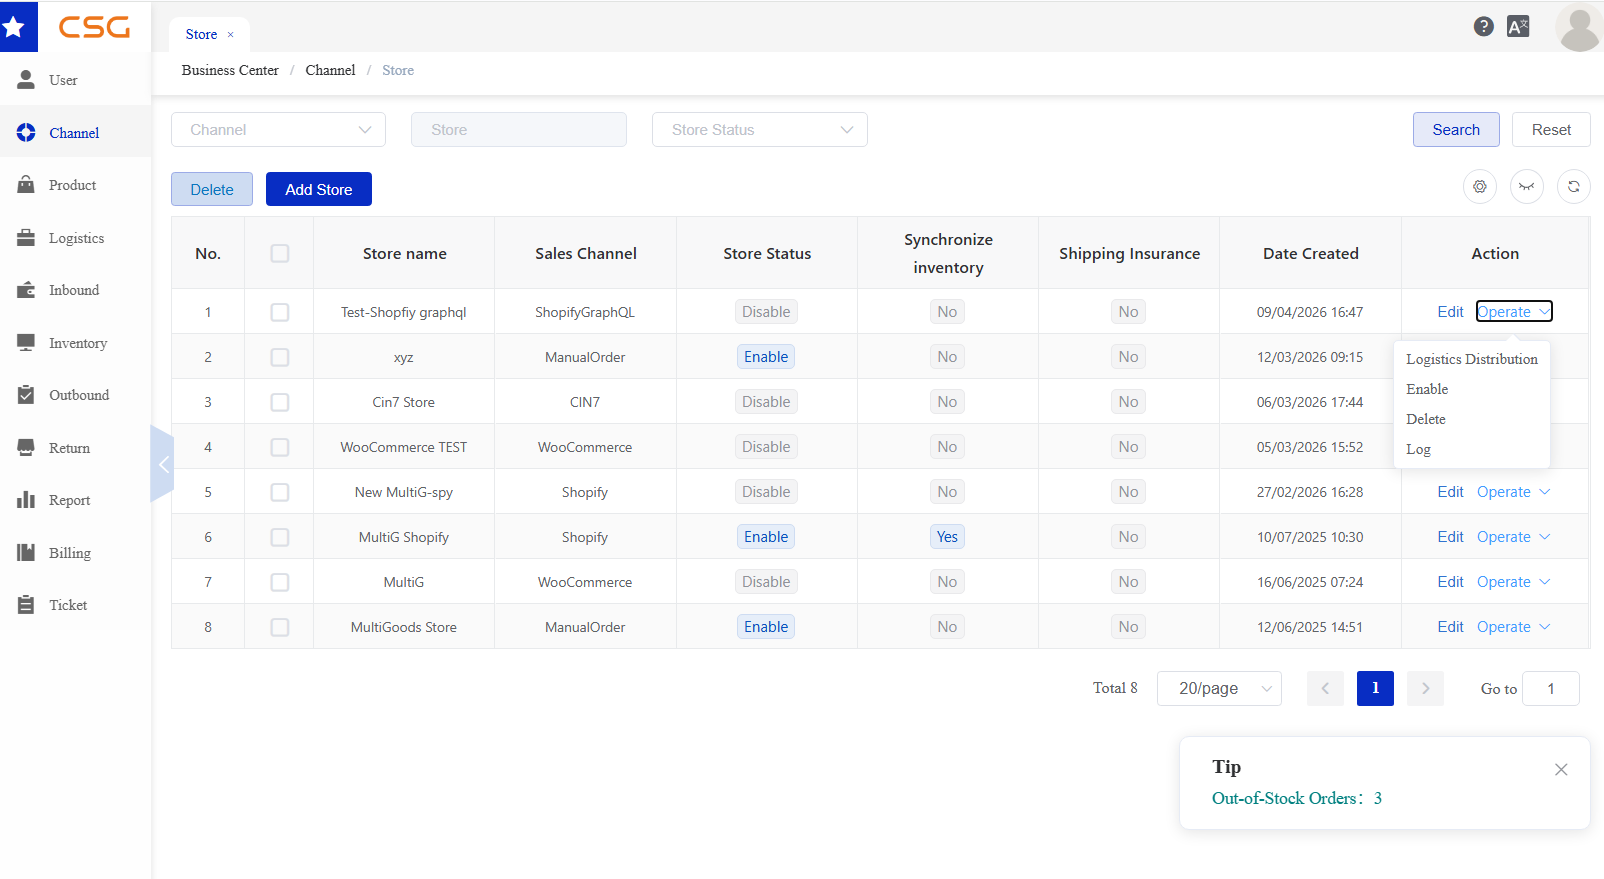
Figure 17. Store Actions screen from the CSG ERP User Manual.
6.2.4.1 Edit Store
Navigation
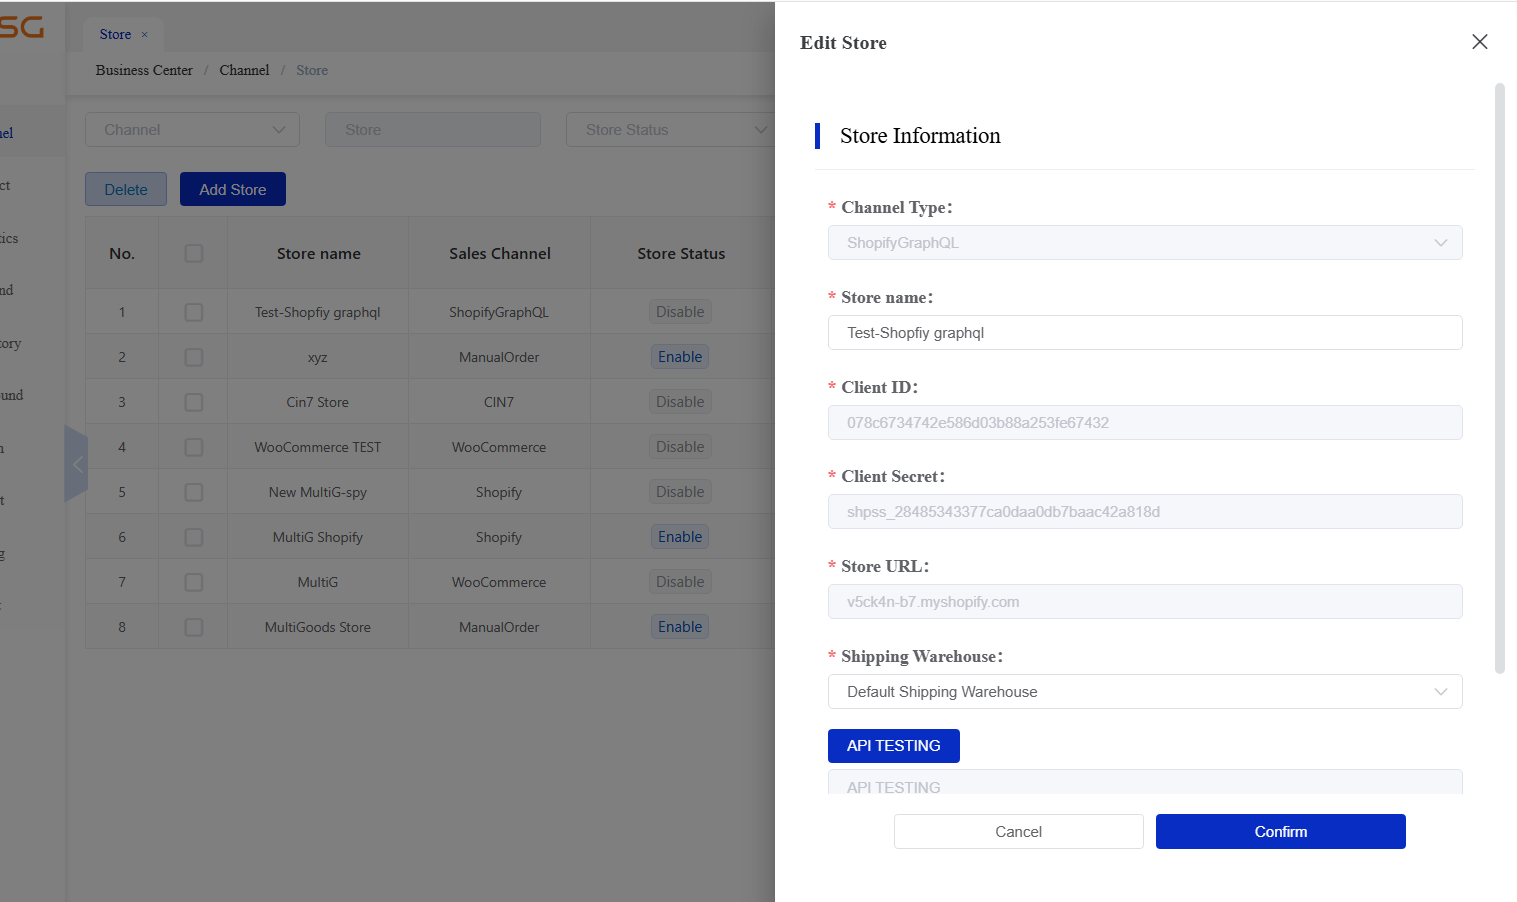
Figure 18. Edit Store screen from the CSG ERP User Manual.
Store Information
| Field | Required | Editable | Description |
|---|---|---|---|
| Channel Type | Must | No | Connected sales channel type. |
| Store Name | Must | Yes | Display name of the connected store. |
| Client ID | Must | No | API Client ID used during store connection. |
| Client Secret | Must | No | API Client Secret used during store connection. |
| Store URL | Must | No | Connected store domain. |
| Shipping Warehouse | Must | Yes | Warehouse that will process orders from this store. |
API Testing
The API Testing button verifies whether the Customer Portal can successfully communicate with the connected sales channel using the configured API credentials.
Possible Results
| Result | Description |
|---|---|
| Success | The connection is valid and the store is ready for synchronization. |
| Failed | The connection could not be established. Verify the API credentials, Store URL, or contact the system administrator. |
Note: API Testing only verifies the connection. It does not synchronize orders, inventory, or update any data.
Figure 19. Edit Store screen from the CSG ERP User Manual.
6.2.4.2 Logistics Distribution
The Logistics Distribution function allows users to configure available courier services for a store.
Users can enable or disable courier services based on operational requirements.
Access Logistics Distribution
Steps
Step 1: Open the Store page.
Step 2: Locate the target store record.
Step 3: Click Operate.
Step 4: Select Logistics Distribution.
The system will open the logistics distribution configuration page.
Courier Service Configuration
The page displays available courier services for the selected store.
| Column | Description |
|---|---|
| Status | Enable or disable the courier service |
| Courier Service Code | Courier service code |
| Courier Service Name | Courier service provider name |
Users can enable or disable courier services by switching the status button.
Click Save to apply the changes.
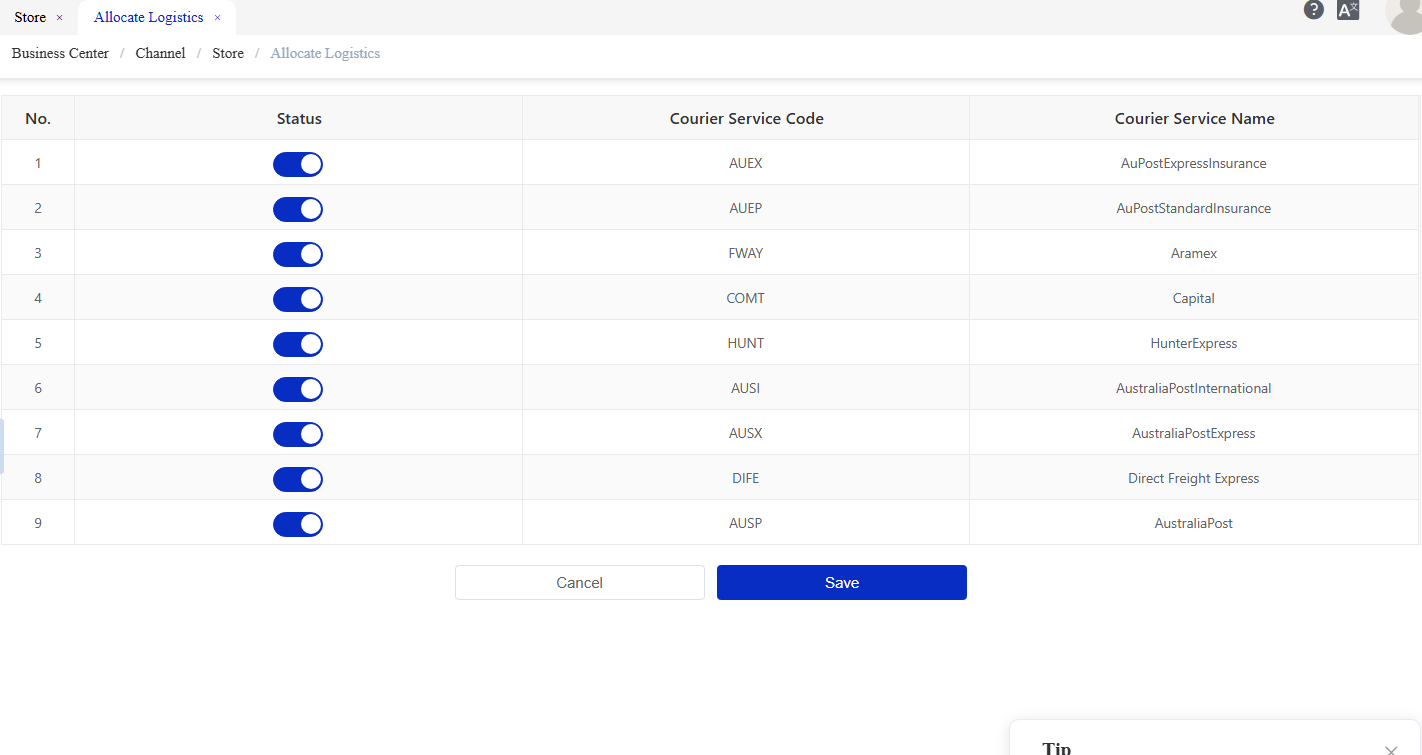
Figure 20. Logistics Distribution screen from the CSG ERP User Manual.
6.2.4.3 Operation Log
Users can view operation records for store-related activities.
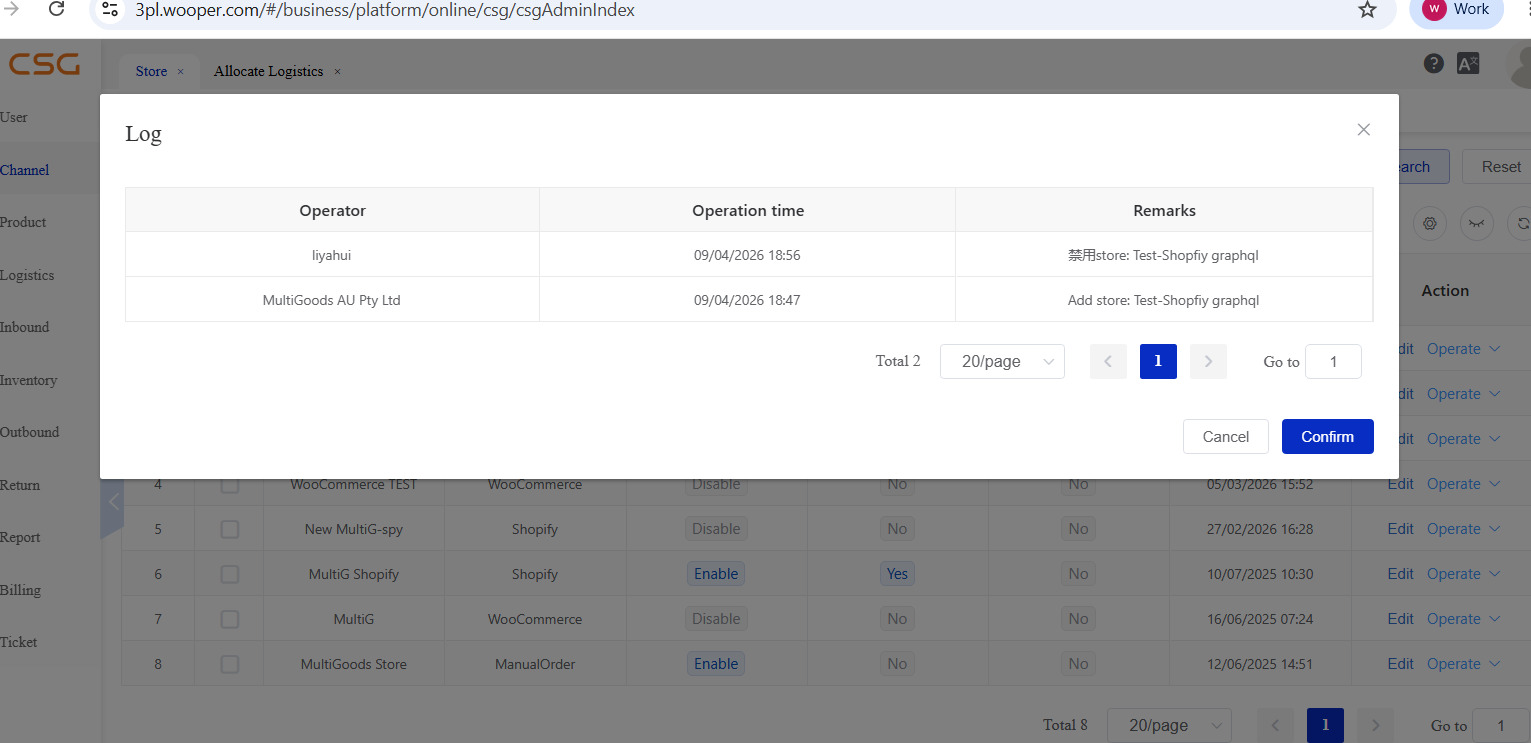
Figure 21. Operation Log screen from the CSG ERP User Manual.
6.3 External Platform Orders
6.3.1 Overview
After a customer places an order on an external sales channel, the order is synchronized to the Customer Portal.
The system captures all synchronized orders and validates the order information. Orders assigned to the current warehouse are eligible to be transferred to the ERP system for processing.
Depending on the system configuration, eligible orders are transferred to the ERP system automatically or can be manually transferred using the Pull function.
Users can use this module to:
View synchronized orders.
Monitor order processing status.
Search platform orders.
Manually pull eligible orders into the ERP system (when Auto Pull is disabled)
Monitor the order lifecycle from synchronization to shipment.
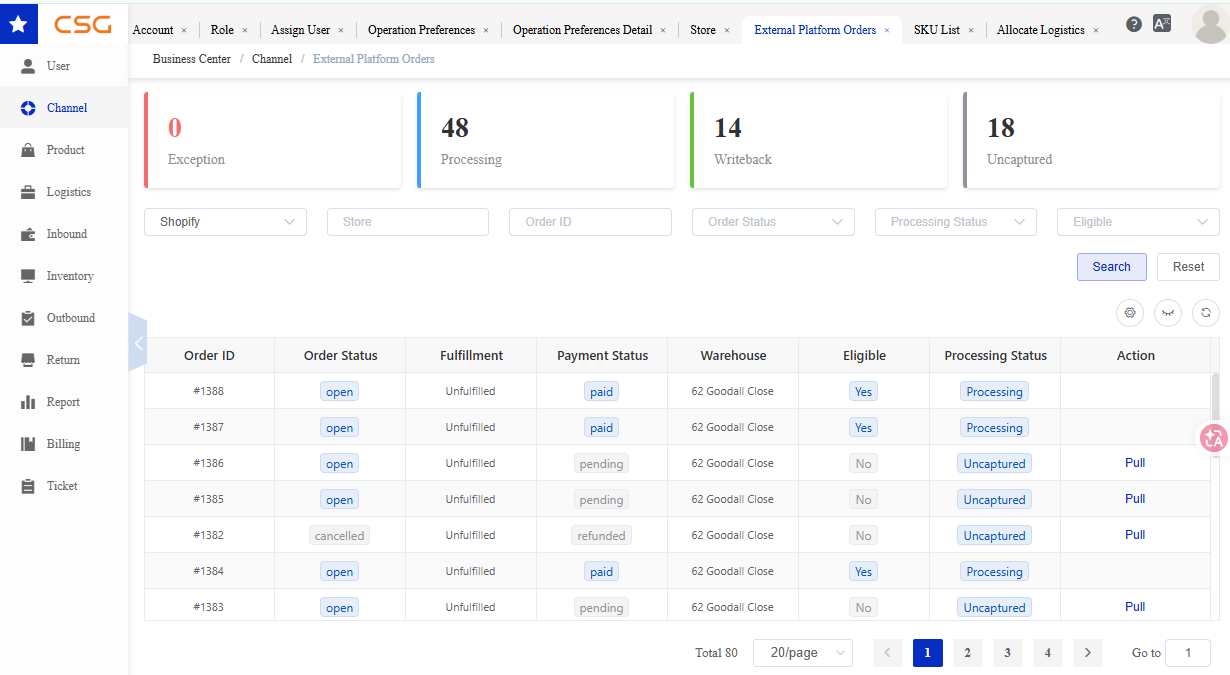
Figure 22. Overview screen from the CSG ERP User Manual.
6.3.2 Dashboard Summary
The dashboard provides a quick overview of synchronized order statuses.
| Status | Description |
|---|---|
| Exception | Orders that failed validation or encountered processing errors. |
| Processing | Orders that have been transferred to the WMS and are currently being processed by the warehouse. |
| Writeback | Shipment information has been successfully written back to the sales platform. |
| Uncaptured | Orders synchronized but not yet transferred to the WMS. |
Notes
Dashboard figures are updated based on the latest synchronization results.
Clicking a status card may display the corresponding order list (if configured).
6.3.3 External Platform Orders List
The External Platform Orders List displays orders synchronized from external sales channels.
Navigation
Available Functions
| Filter | Description |
|---|---|
| Platform | View orders from a specific sales channel. |
| Store | View orders from a specific store. |
| Order ID | Search by platform order number. |
| Order Status | Search by platform order status. |
| Processing Status | Search by WMS processing status. |
| Eligible | Filter orders by eligibility status. |
6.3.4 Search Orders
Users can search platform orders using multiple filter conditions.
Search Criteria
| Field | Description |
|---|---|
| Platform | Sales channel (e.g., Shopify) |
| Store | Store name |
| Order ID | Platform order number |
| Order Status | Platform order status |
| Processing Status | WMS processing status |
| Eligible | Whether the order can be imported |
Steps
Navigate to Channel → External Platform Orders.
Enter one or more search conditions.
Click Search.
Review the search results.
6.3.5 Order Information
Each synchronized order contains the following information:
| Field | Description |
|---|---|
| Order ID | External platform order number |
| Order Status | Current platform order status |
| Fulfillment | Fulfillment status on the platform |
| Payment Status | Payment status of the order |
| Warehouse | Assigned fulfillment warehouse |
| Eligible | Whether the order meets import conditions |
| Processing Status | Current WMS processing status |
| Action | Available operation for the order |
Order Status
| Status | Description | |
|---|---|---|
| Uncaptured | The order has been synchronized but has not yet been transferred to the WMS. | |
| Processing | The order has been transferred to the WMS and is currently being processed. | |
| Writeback | Shipment information has been successfully written back to the external sales platform. | |
| Exception | The order cannot be processed due to validation or synchronization errors. |
Payment Status
| Status | Description |
|---|---|
| Paid | Payment successfully received |
| Pending | Payment not completed |
| Refunded | Payment refunded |
Processing Status
| Status | Description |
|---|---|
| Processing | Order has been imported and is being processed |
| Uncaptured | Order has not yet been imported into WMS |
6.3.6 Pull Orders
The Pull function manually transfers eligible orders assigned to the current warehouse into the Warehouse Management System (WMS).
Steps
Locate an order with:
Eligible = Yes
Processing Status = Uncaptured
Click Pull.
The system validates the order information.
The order is transferred to the WMS.
Processing Status changes to Processing.
Notes
Only eligible orders can be pulled.
Orders that fail validation cannot be transferred to the WMS.
Successfully transferred orders enter the warehouse fulfillment process.
If Auto Pull is enabled, eligible orders are transferred automatically, and manual Pull is not required.
Source
CSG ERP User Manual, section 6, "Channel Management".