9. Inbound
The Inbound module is used to create and monitor stock-receipt instructions for goods being delivered to the warehouse.
9.1 Overview
The Inbound module is used to manage products received into the warehouse.
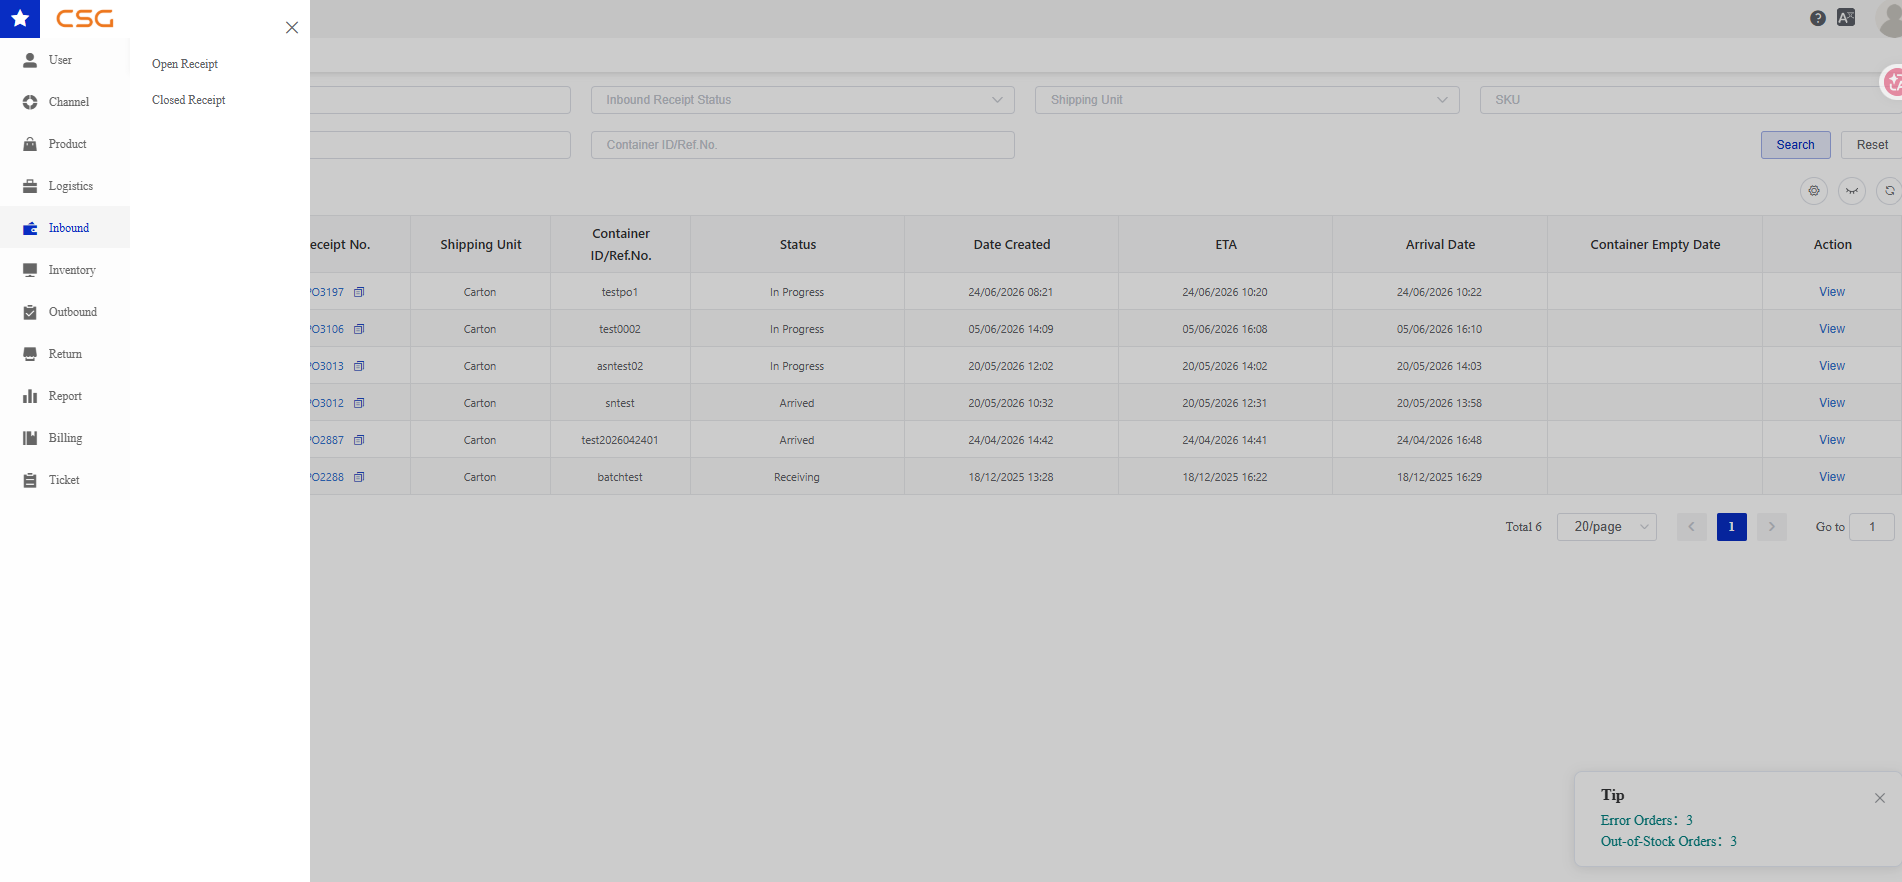
Figure 1. Overview screen from the CSG ERP User Manual.
The Inbound module is used to manage products being received into the warehouse.
In most business processes, an inbound receipt is created based on a Purchase Order (PO). When a PO is created, the corresponding receipt appears in the Open Receipt list, where warehouse staff record the actual quantities received and complete the receiving process.
Once all products have been received and confirmed, the receipt is moved to the Closed Receipt list.
The Inbound module includes:
Open Receipt – Displays inbound receipts that are waiting to be received or are currently being processed. Most Open Receipts are generated from Purchase Orders (POs).
Closed Receipt – Displays inbound receipts that have been completed or cancelled.
Relationship with Purchase Orders (PO)
A Purchase Order (PO) records what is expected to be delivered to the warehouse, while an Inbound Receipt records what is actually received.
During the receiving process, warehouse staff verify the delivered products against the PO and record any quantity differences or discrepancies before completing the receipt.
Relationship with Inventory
After an inbound receipt is completed, the received quantities are added to warehouse inventory and become available for allocation and outbound fulfillment.
9.2 Open Receipt
9.2.1 Overview
Navigation
The Open Receipt page displays all inbound receipts that are currently active or being processed.
Users can:
Search inbound receipts
Create a new receipt
Export receipt records
View receipt details
Additional functions available on view page include:
Print – Print the receipt.
Operation Log – View the receipt operation history.
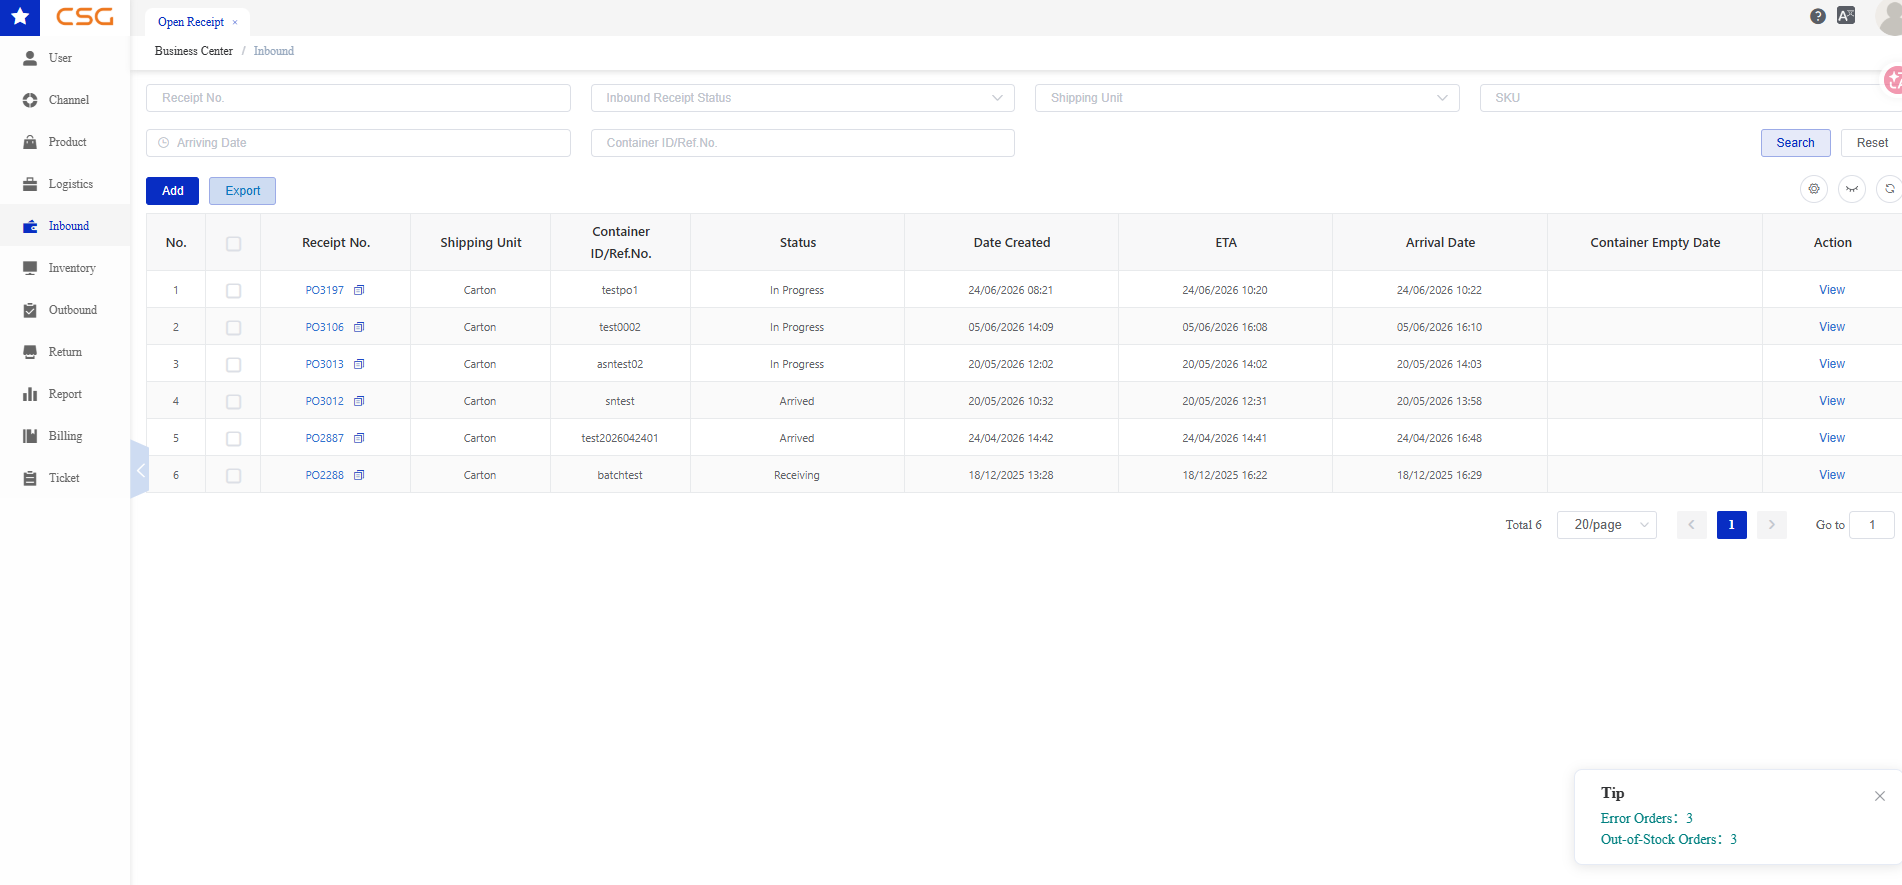
Figure 2. Overview screen from the CSG ERP User Manual.
9.2.2 Receipt List Information
The Open Receipt list displays the following information.
| Field | Description |
|---|---|
| Receipt No. | Unique inbound receipt number. |
| Shipping Unit | Shipping unit (e.g. Carton, Pallet, Container). |
| Container ID / Ref. No. | Container number or supplier reference number. |
| Status | Indicates the current stage of the inbound receipt. Typical statuses include: • Pending – The receipt has been created but receiving has not started. • Receiving – Warehouse staff are currently receiving and verifying the products. • Completed – All products have been received successfully. The receipt is moved to Closed Receipt and inventory is updated. • Cancelled – The receipt has been cancelled and no inventory will be received. |
| Date Created | Date the receipt was created. |
| ETA | Estimated arrival date and time of the shipment. |
| Arrival Date | Actual date and time the shipment arrived at the warehouse. |
| Container Empty Date | Date the container was fully unloaded. |
| Action | View receipt details, receive products, or complete the receiving process (depending on the current status). |
9.2.3 Search Receipt
Users can search inbound receipts using one or more filter conditions.
Search Criteria
| Field | Description |
|---|---|
| Receipt No. | Receipt number |
| Inbound Receipt Status | Receipt status |
| Shipping Unit | Shipping unit |
| SKU | Product SKU |
| Arrival Date | Arrival date |
| Container ID / Ref. No. | Container or reference number |
Steps
Navigate to Inbound → Inbound Receipt.
Enter one or more search conditions.
Click Search.
Review the matching records.
9.2.4 Add Receipt
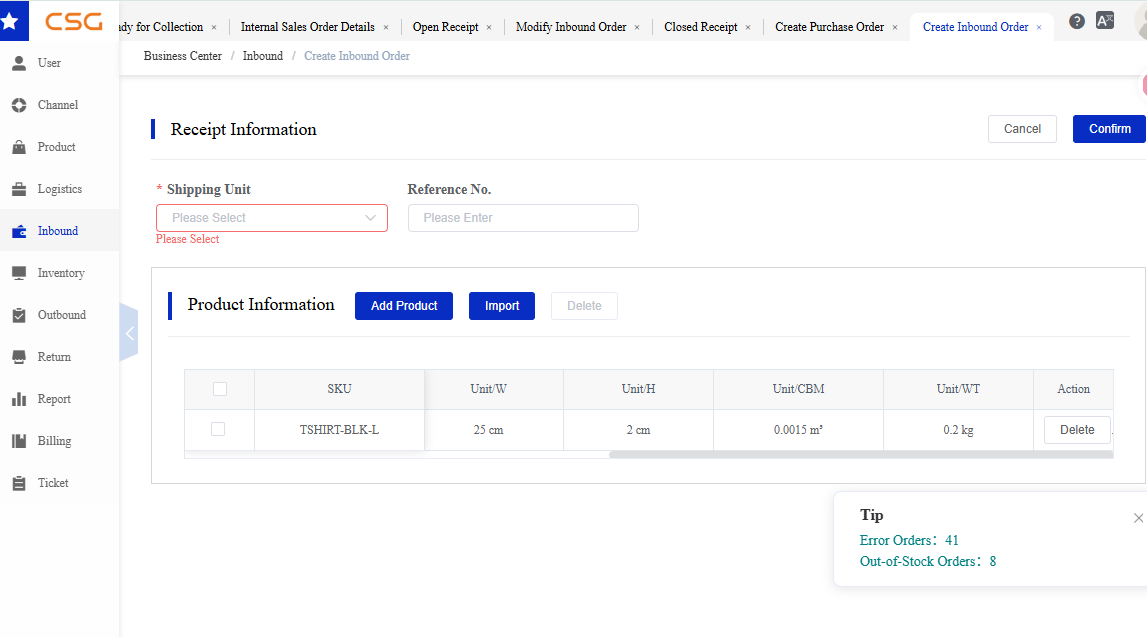
Figure 3. Add Receipt screen from the CSG ERP User Manual.
The Add Receipt function allows users to create a new inbound receipt for products arriving at the warehouse.
A newly created receipt is assigned the status New and is displayed in the Open Receipt list for warehouse receiving and processing.
Navigation
9.2.4.1 Receipt Information
Before adding products, users must first complete the receipt information.
The required fields vary depending on the selected Shipping Unit.
9.2.4.2 Shipping Unit
The Shipping Unit specifies how the goods are delivered to the warehouse. The system displays different receipt fields based on the selected shipment type.
Carton
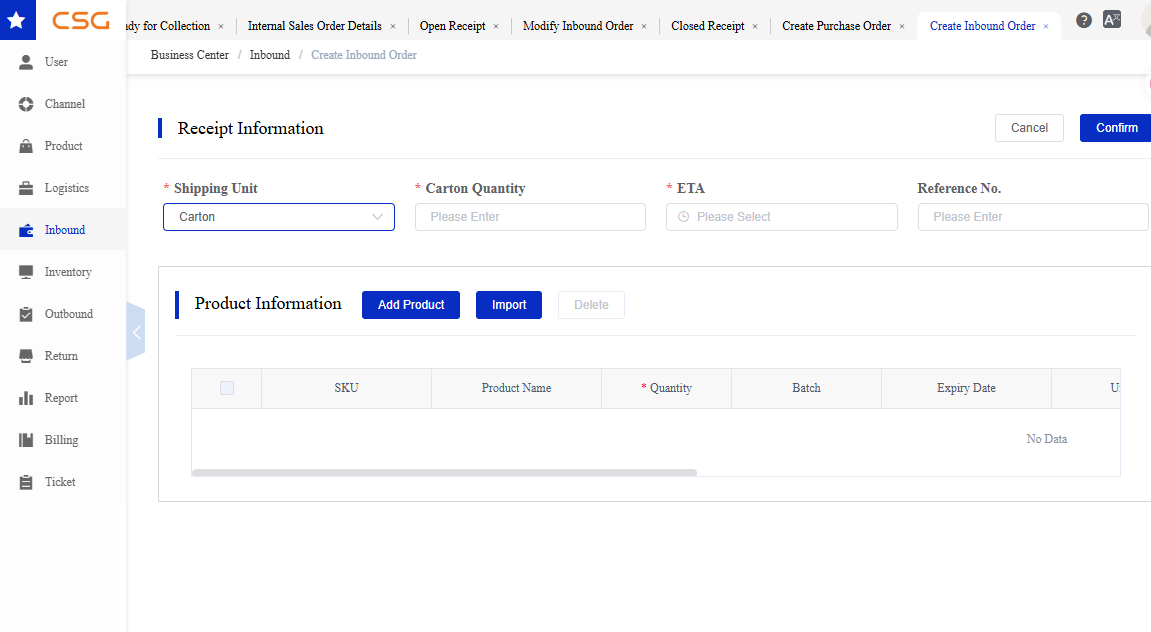
Figure 4. Shipping Unit screen from the CSG ERP User Manual.
Select Carton when the goods are delivered in individual cartons or boxes.
Required Fields
| Field | Description |
|---|---|
| Carton Quantity | Total number of cartons included in the shipment. |
| ETA | Estimated arrival date and time. |
| Reference No. | Shipment or supplier reference number (optional). |
Recommendation
Select Carton only when the shipment is physically received as cartons.
Ensure the carton quantity matches the actual shipment delivered to the warehouse.
Pallet
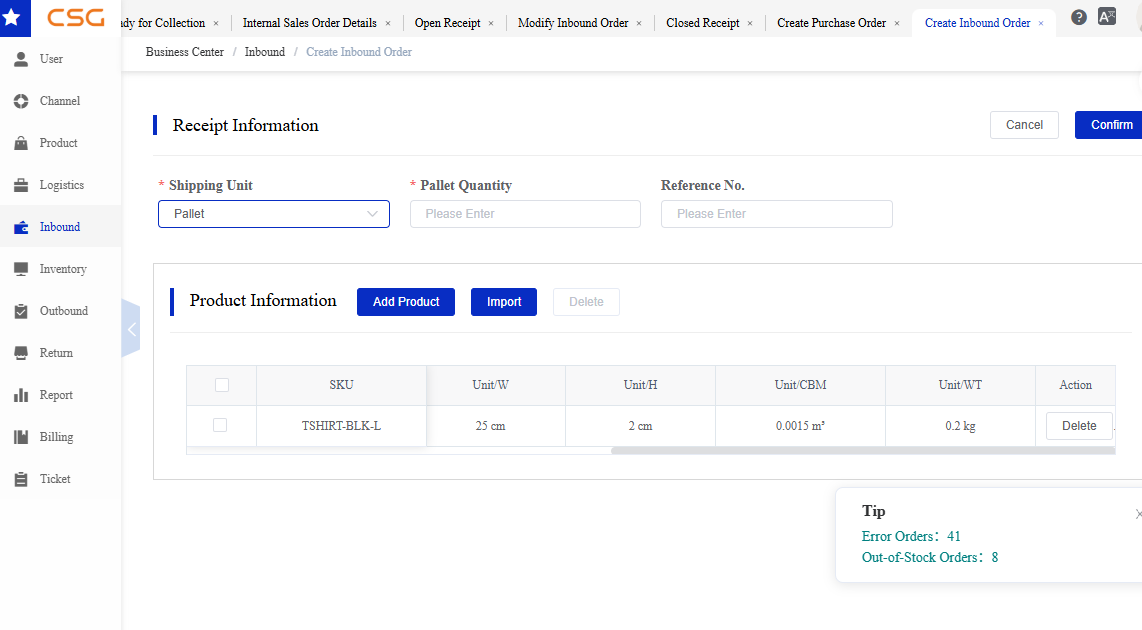
Figure 5. Shipping Unit screen from the CSG ERP User Manual.
Select Pallet when the goods are delivered on pallets.
Required Fields
| Field | Description |
|---|---|
| Pallet Quantity | Total number of pallets included in the shipment. |
| Reference No. | Shipment or supplier reference number (optional). |
Recommendation
Select Pallet only when the shipment is delivered on pallets.
Enter the correct pallet quantity to assist warehouse receiving and unloading.
Container
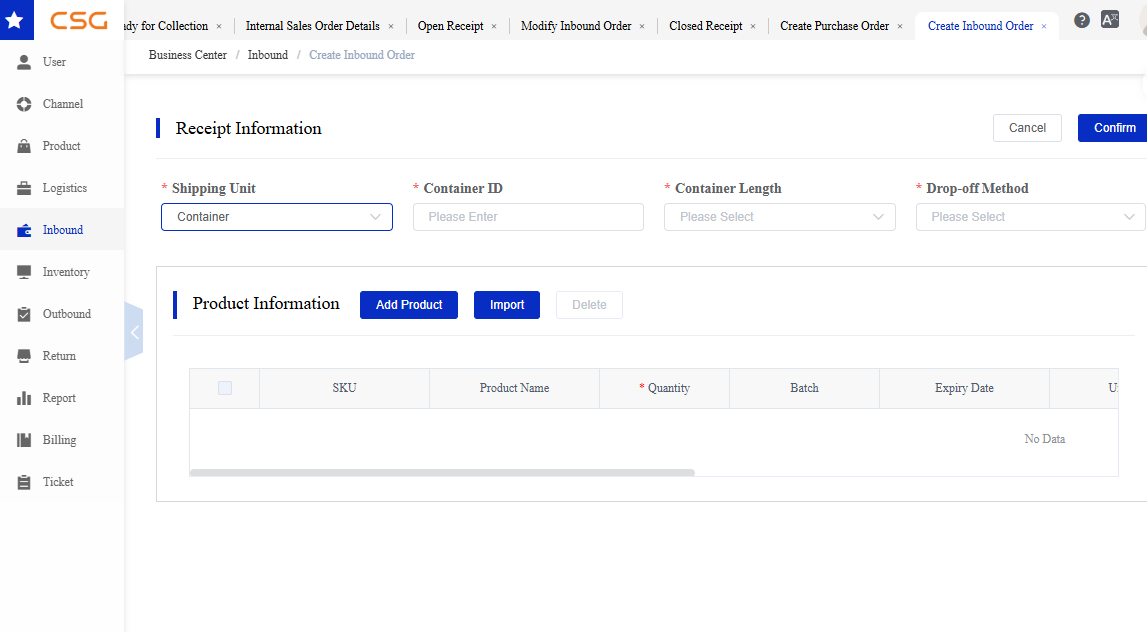
Figure 6. Shipping Unit screen from the CSG ERP User Manual.
Select Container when the goods are delivered in a shipping container.
Required Fields
| Field | Description |
|---|---|
| Container ID | Shipping container identification number. |
| Container Length | Select the size of the container (for example, 20 ft or 40 ft). |
| Drop-off Method | Select the method used to deliver the container to the warehouse. |
Recommendation
Select Container only for container shipments.
Ensure the container information is accurate to support warehouse scheduling and unloading.
Important: Select the Shipping Unit that matches the actual shipment. The selected Shipping Unit determines which receipt information must be completed.
9.2.4.3 Product Information
The Product Information section displays all products added to the inbound receipt. Product details are automatically retrieved from the SKU List after a product is selected.
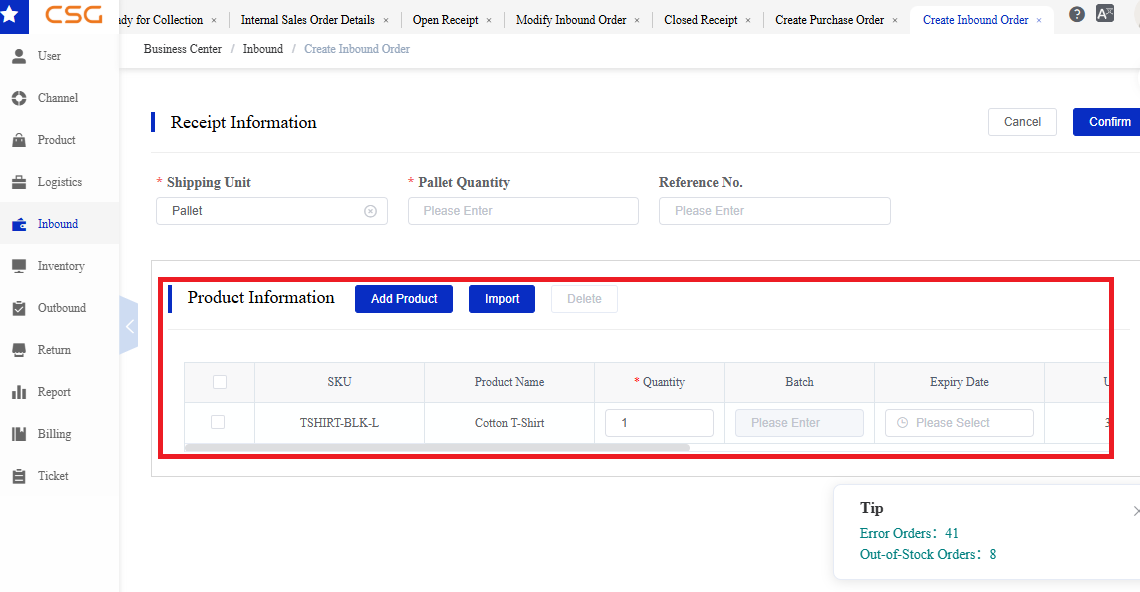
Figure 7. Product Information screen from the CSG ERP User Manual.
The following information is displayed.
| Field | Description |
|---|---|
| SKU | Unique product identifier. |
| Unit/L | Unit length of the product. |
| Unit/W | Unit width of the product. |
| Unit/H | Unit height of the product. |
| Unit/CBM | Cubic volume (CBM) of one unit. |
| Unit/WT | Weight of one unit. |
| Action | Remove the selected product from the current inbound receipt. |
Functions
| Function | Description |
|---|---|
| Add Product | Add one or more products from the existing SKU List. |
| Import | Import multiple products using the system import template. |
| Delete | Remove the selected product from the current inbound receipt. This action does not delete the product from the SKU List. |
Notes
Products must already exist in Product → SKU List before they can be added to an inbound receipt.
Product dimensions, weight, and CBM are automatically populated from the SKU master data.
Product information displayed in this section is read-only. To modify product dimensions or weight, update the SKU in .
The Delete action removes the product only from the current inbound receipt and does not delete the SKU or affect its inventory records.
9.2.4.4 Add Product
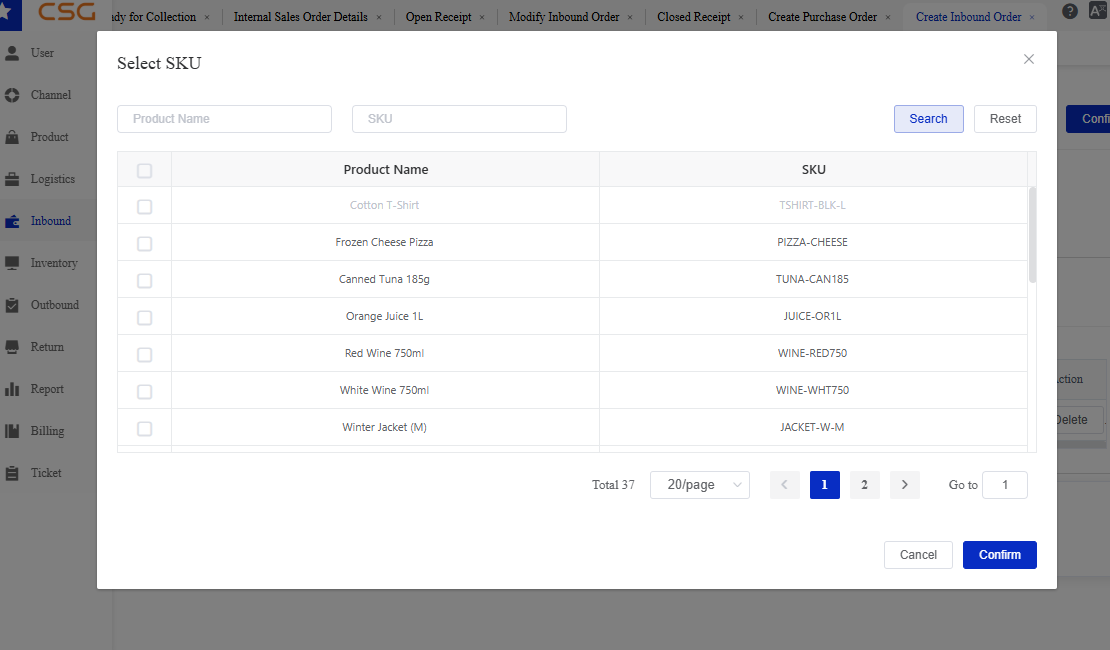
Figure 8. Add Product screen from the CSG ERP User Manual.
The Add Product function allows users to select one or more products from the existing SKU List.
Only products that have already been created in can be selected.
Steps
Click Add Product.
Search for products by Product Name or SKU.
Select one or more products.
Click Confirm.
Enter the receiving quantity for each product.
Notes
Multiple products can be selected at the same time.
Products must already exist in the SKU List.
If Batch and Expiration is enabled for a SKU, users must enter the Batch Number and Expiry Date before confirming the receipt.
9.2.4.5 Import Products
The Import function allows users to add multiple products to the inbound receipt using the system import template.
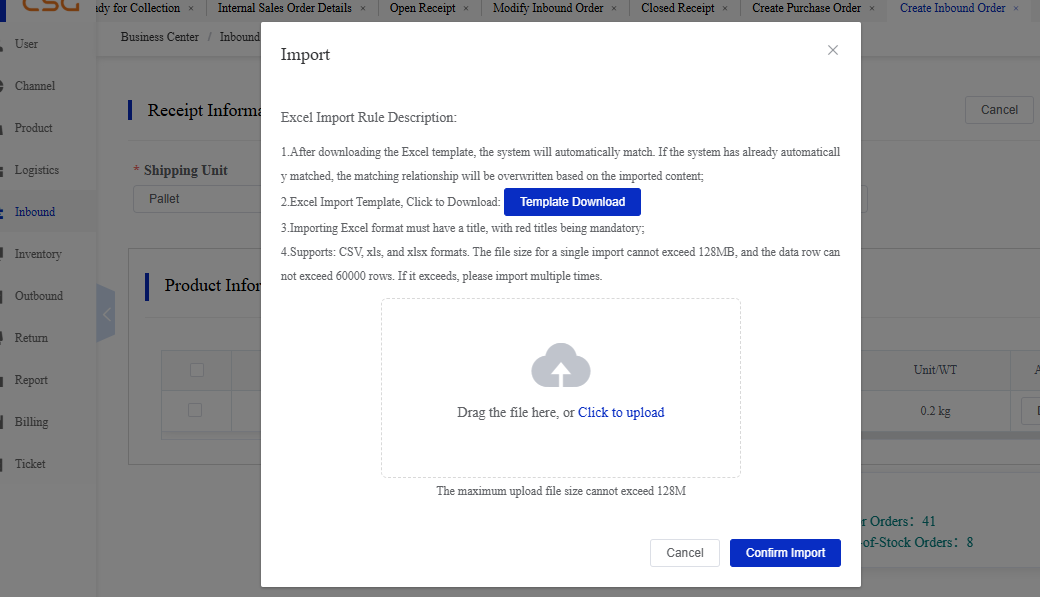
Figure 9. Import Products screen from the CSG ERP User Manual.
Steps
Click Import.
Download the import template if required.
Complete the template with the required product information.
Upload the completed template.
Review the imported products before confirming the receipt.
Notes
Only existing SKUs can be imported.
Invalid or duplicate records may be rejected during import.
Review imported quantities before confirming the receipt.
Batch and Expiration information must be provided for products that require batch management.
9.2.5 Edit Receipt
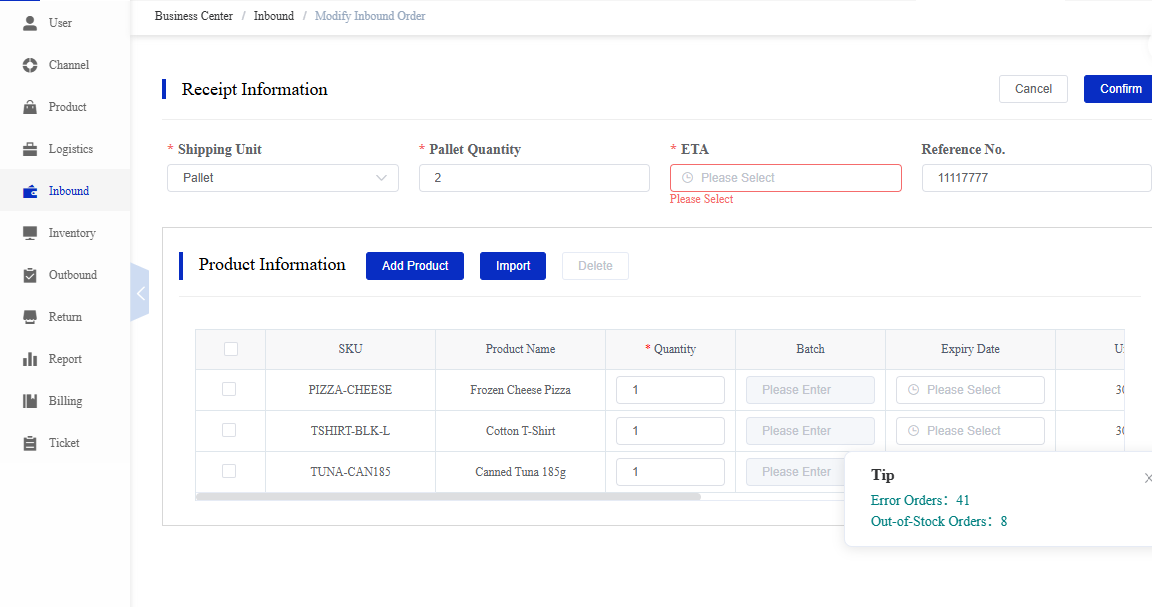
Figure 10. Edit Receipt screen from the CSG ERP User Manual.
The Edit function allows users to update an existing inbound receipt before the receiving process begins.
Important: Only inbound receipts with the status New can be edited.
Navigation
Receipt Information
Users can update the receipt information before receiving begins.
| Field | Description |
|---|---|
| Shipping Unit | Update the shipment type (e.g. Carton, Pallet, or Container). |
| Pallet Quantity | Update the total number of pallets in the shipment. |
| ETA | Update the estimated arrival date and time. |
| Reference No. | Update the shipment, supplier, or container reference number. |
Product Information
Users can maintain the products included in the inbound receipt.
Available functions include:
Add Product – Add additional products from the existing SKU List.
Import – Import multiple products using the system import template.
Delete – Remove selected products from the current inbound receipt.
The Product Information table displays the following information.
| Field | Description |
|---|---|
| SKU | Product SKU code. |
| Product Name | Product name. |
| Quantity | Quantity to be received. |
| Unit Dimensions | Product dimensions automatically retrieved from the SKU master data. |
| Unit Weight | Product weight automatically retrieved from the SKU master data. |
| Unit CBM | Product volume automatically retrieved from the SKU master data. |
Steps
Navigate to Inbound → Inbound Receipt.
Locate a receipt with the status New.
Click Edit.
Update the receipt information if required.
Add, import, or remove products as necessary.
Update the product quantities.
Click Confirm to save the changes.
Notes
Only receipts with the status New can be edited.
Products must already exist in Product → SKU List before they can be added.
Product dimensions, weight, and CBM are automatically populated from the SKU master data and cannot be edited in the inbound receipt.
Removing a product from the receipt only removes it from the current receipt. It does not delete the SKU from the Product module.
Once the receipt status changes from New to another status, the receipt can no longer be edited.
9.3 Closed Receipt
9.3.1 Overview
Navigation
The Closed Receipt page displays inbound receipts that have been completed or cancelled.
Completed and cancelled receipts are maintained for historical reference, inventory verification, and audit purposes. Once a receipt is closed, it becomes read-only and can no longer be edited.
Users can:
Add a new inbound receipt.
Search completed or cancelled receipts.
View receipt details.
Notes
Closed receipts are read-only and cannot be edited.
Completed receipts have already updated warehouse inventory.
Cancelled receipts are retained for historical reference and do not update inventory.
To receive a new shipment, click Add to create a new inbound receipt instead of modifying an existing closed receipt.
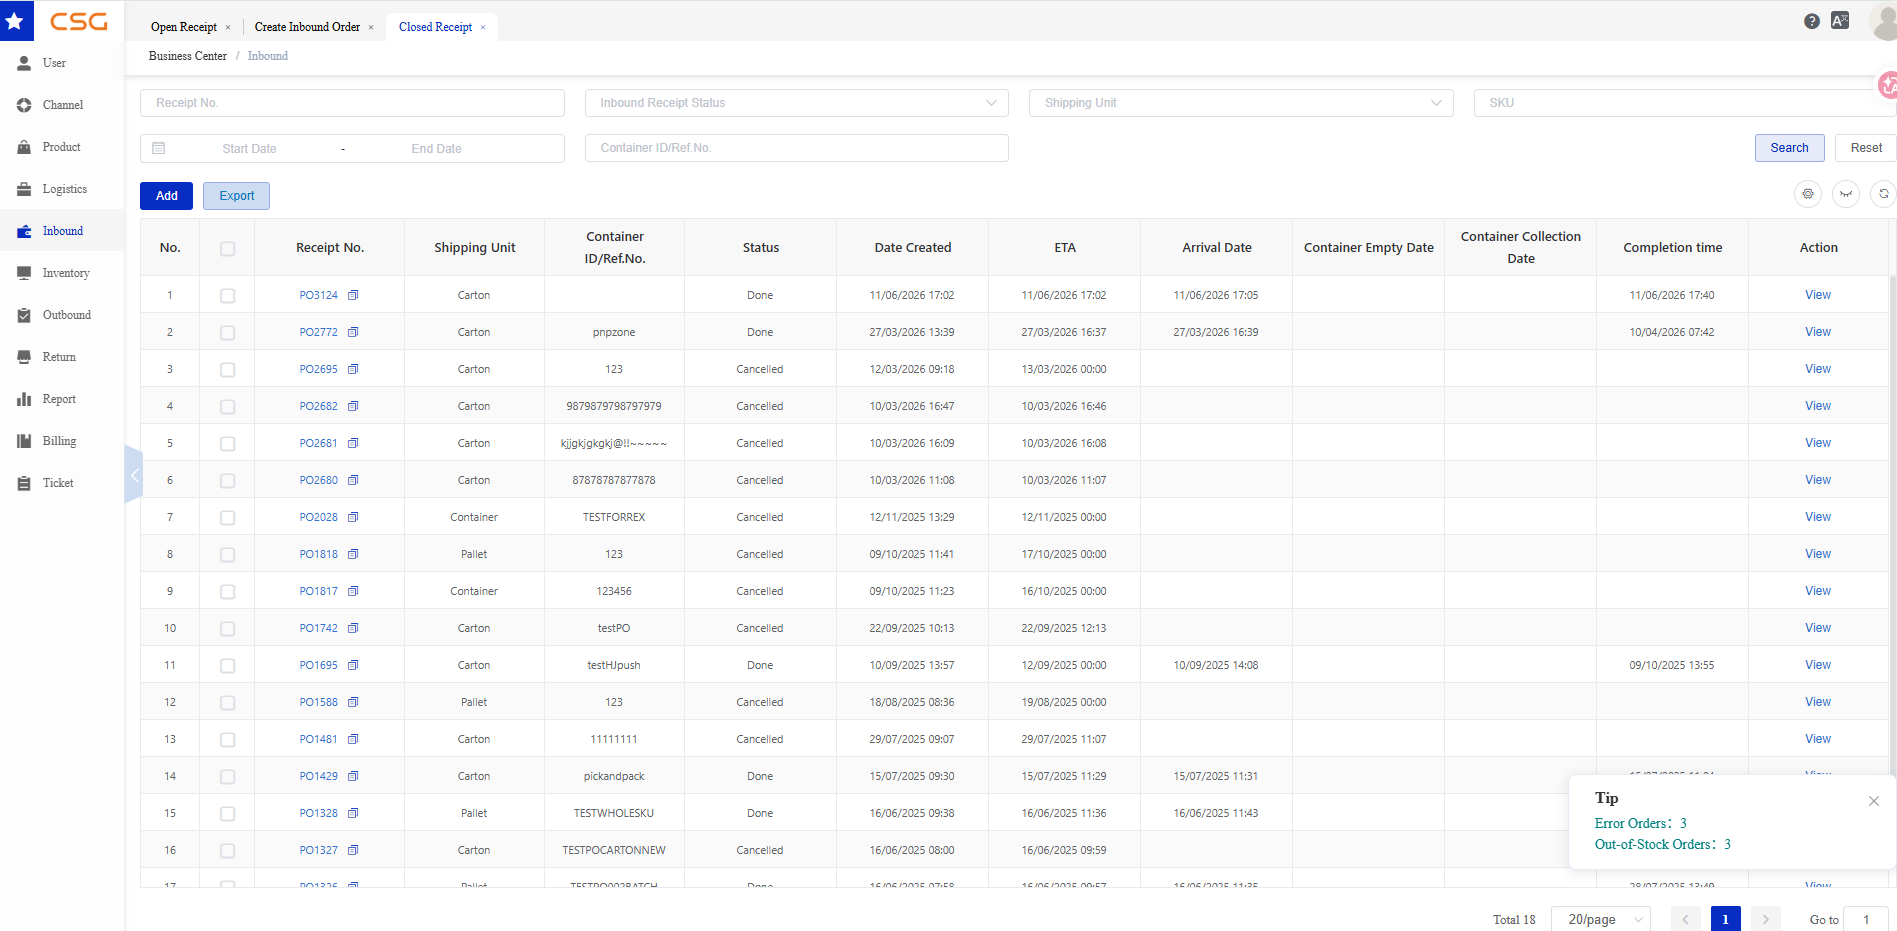
Figure 11. Overview screen from the CSG ERP User Manual.
9.3.2 Closed Receipt Information
The Closed Receipt list includes the following information.
| Field | Description |
|---|---|
| Receipt No. | Inbound receipt number |
| Shipping Unit | Shipping unit |
| Container ID / Ref. No. | Container reference |
| Status | Receipt completion status |
| Date Created | Creation date |
| ETA | Estimated arrival time |
| Arrival Date | Actual arrival date |
| Container Empty Date | Container empty date |
| Completion Time | Time the receipt was completed |
| Action | View receipt details |
9.3.3 View Receipt Details
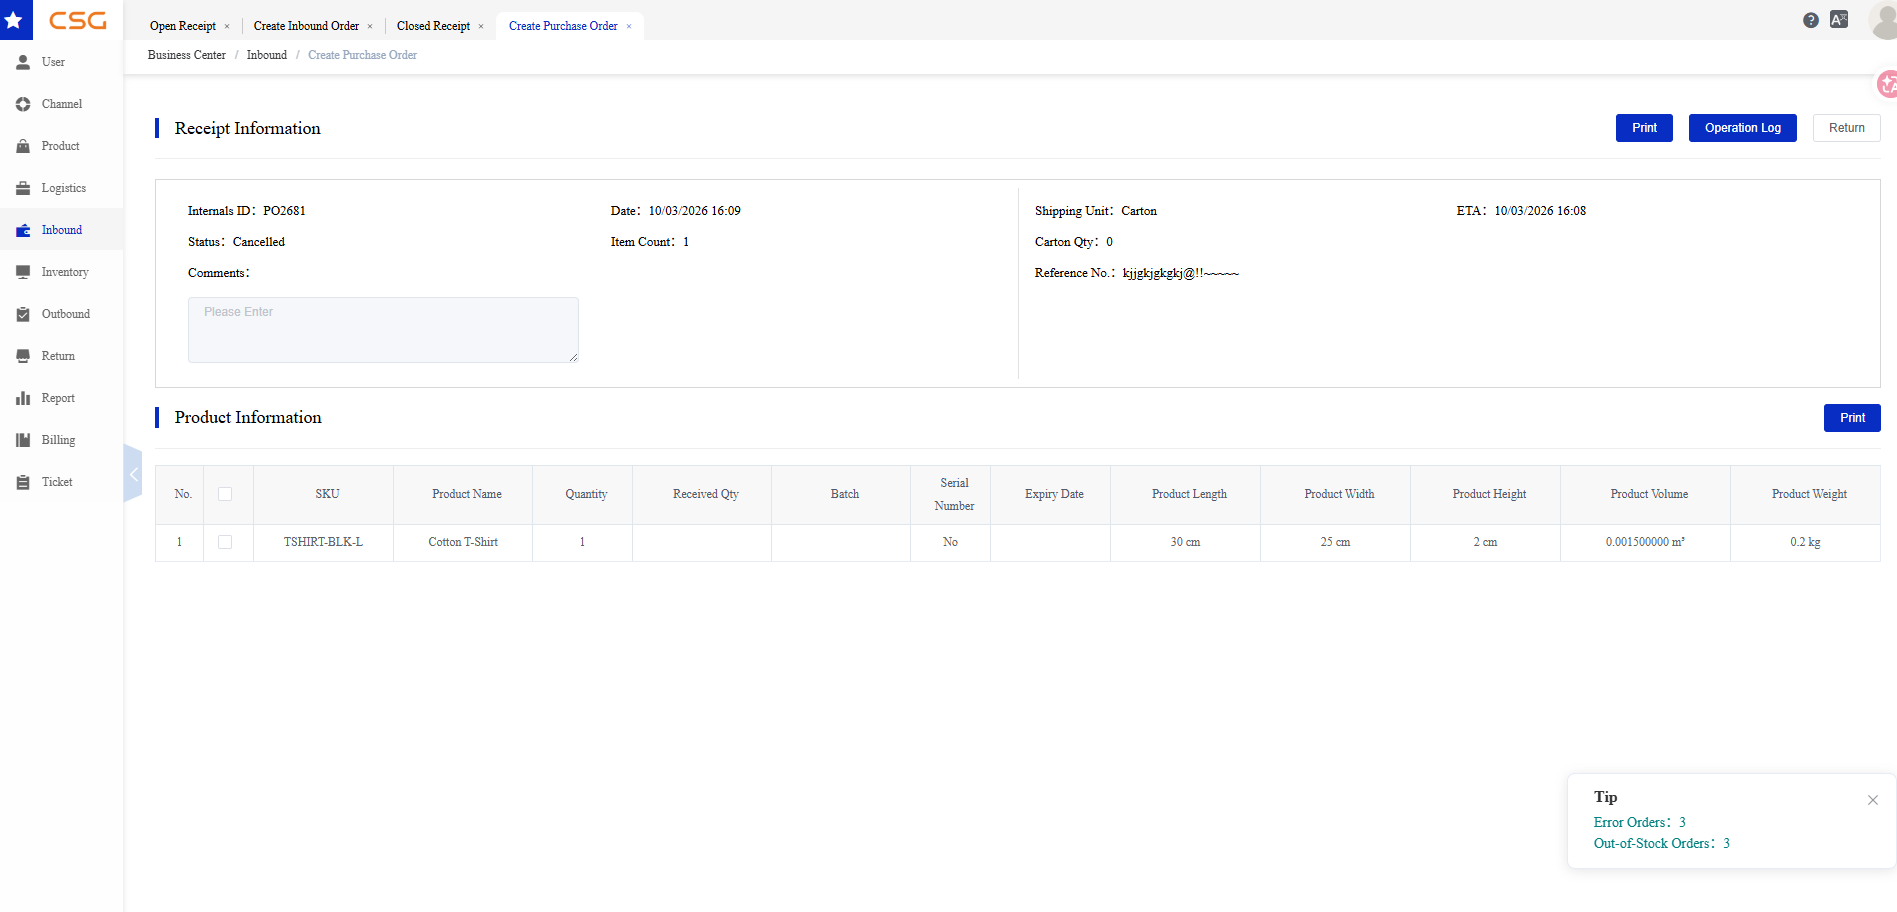
Figure 12. View Receipt Details screen from the CSG ERP User Manual.
Click View to display the completed inbound receipt.
The detail page includes:
Receipt Information – Displays the receipt details, including status, shipping information, ETA, reference number, and comments.
Product Information – Displays all products included in the receipt, including SKU, quantity, dimensions, weight, batch number, and expiry date.
Available functions on this page:
| Function | Description |
|---|---|
| Print the receipt information. | |
| Operation Log | View the operation history of the receipt. |
| Return | Return to the previous receipt list without making changes. |
9.3.4 Add Closed Receipts
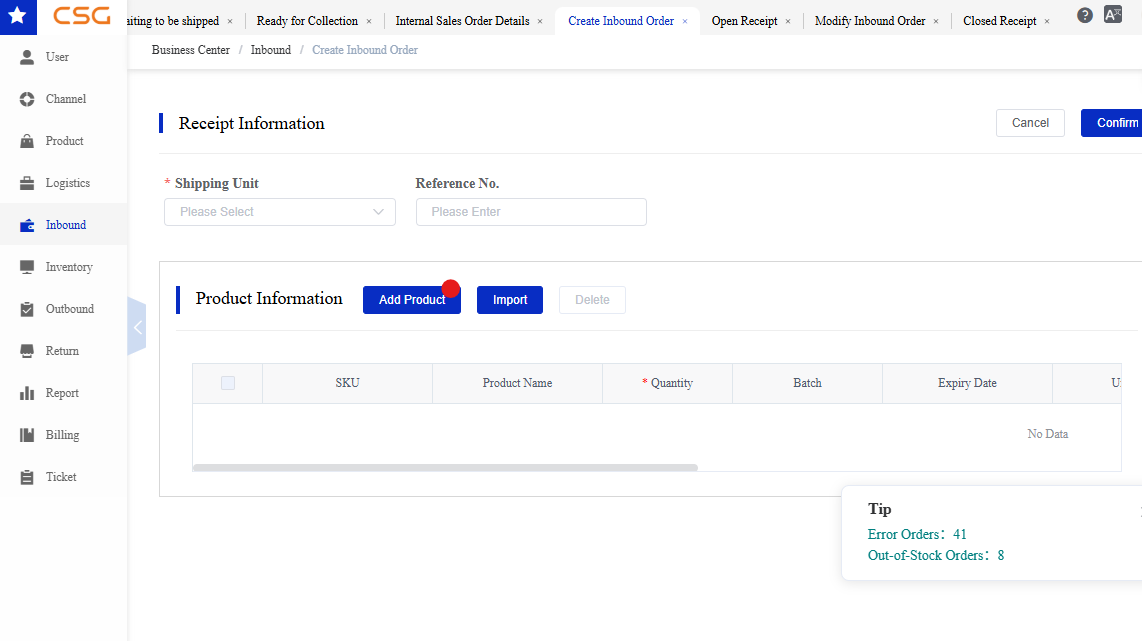
Figure 13. add closed receipts screen from the CSG ERP User Manual.
The Add function allows users to create a new inbound receipt from the Closed Receipt page.
The creation process is the same as described in Section 9.2.4 Add Receipt.
Navigation
Steps
Follow the same steps described in Section 9.2.4 Add Receipt to create a new inbound receipt.
Notes
Creating a receipt from the Closed Receipt page follows the same process as creating a receipt from the Open Receipt page.
A receipt created from the Open Receipt page is created with the status New and appears in the Open Receipt list for further processing.
A receipt created from the Closed Receipt page is created with the status Done and is displayed in the Closed Receipt list.
For detailed instructions on entering receipt information and adding products, refer to Section 9.2.4 Add Receipt.
Source
CSG ERP User Manual, section 9, "Inbound".